
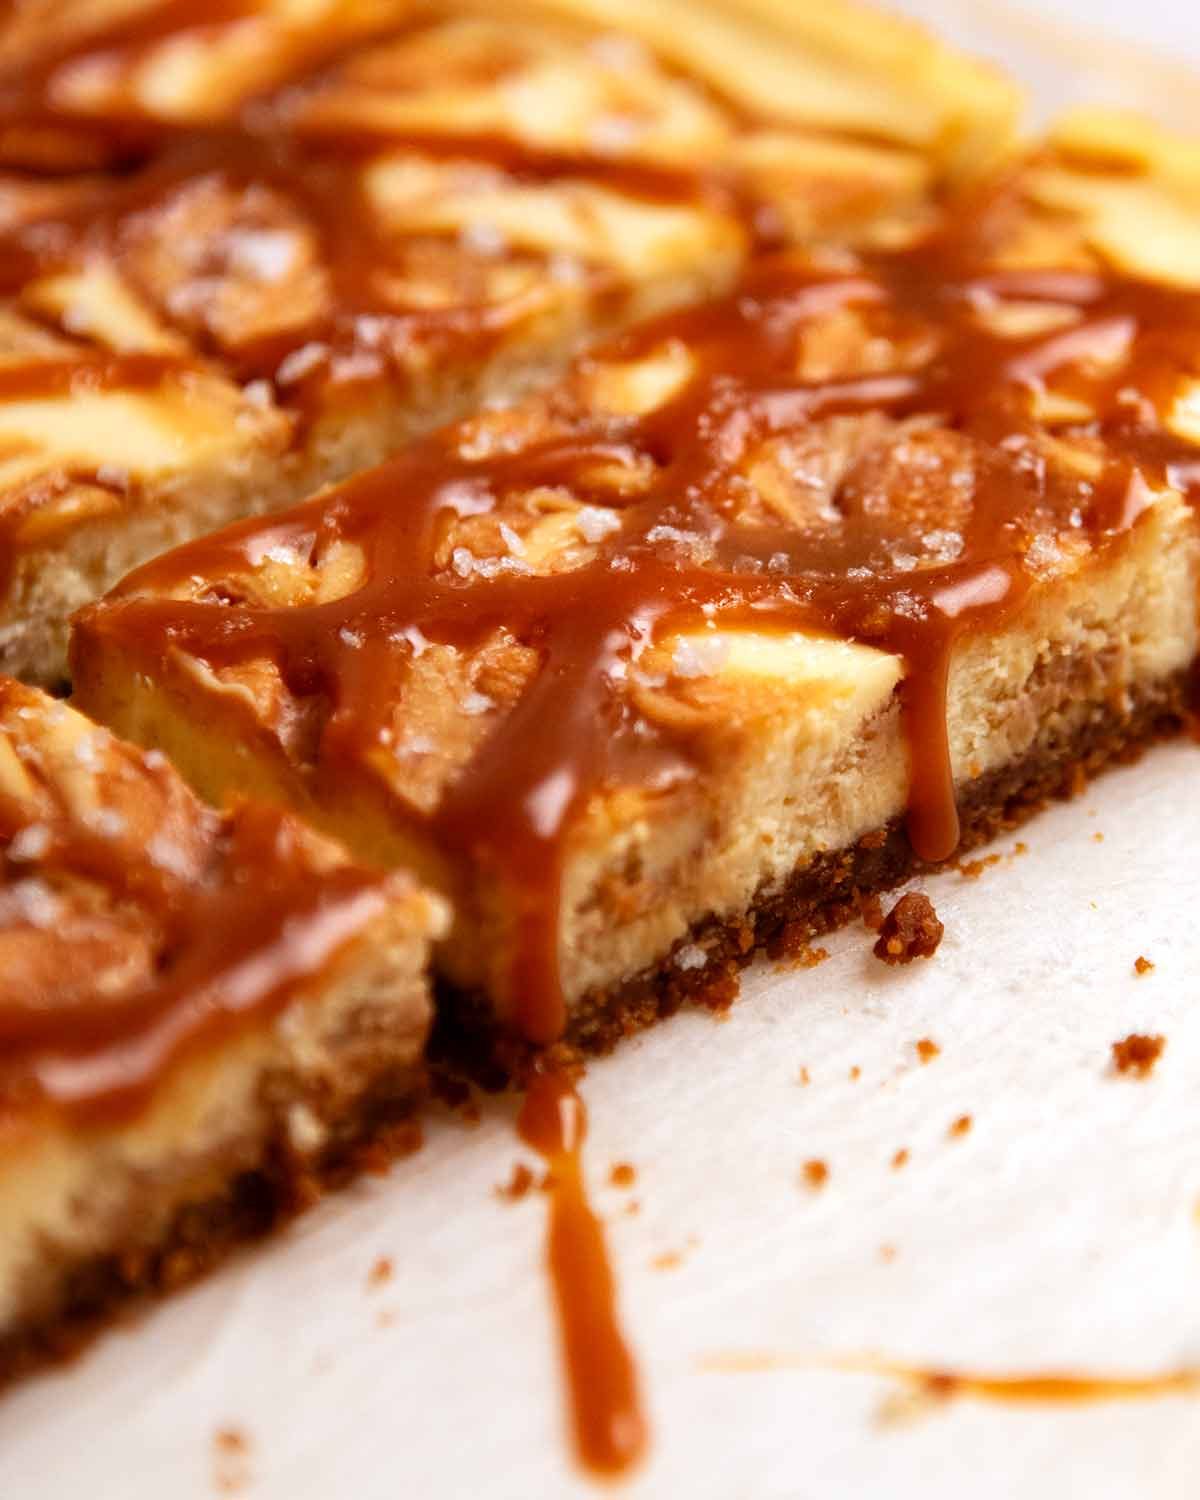
If you’re looking for a Salted Caramel Cheesecake with big caramel flavour in every bite, you’ve found it. Swirls of buttery caramel baked right throughout the creamy cheesecake filling and extra caramel swished over the top, this is rich, creamy, sweet, salty and completely unapologetic!
This Salted Caramel Cheesecake was irritatingly hard to crack!
When you’re greedy like me and want proper caramel flavour in every bite – not just a faint whiff of “vaguely tastes like caramel ….. maybe?” – making a Salted Caramel Cheesecake suddenly becomes harder than it sounds.
I really thought it would be simple: swirl caramel through my favourite cheesecake batter, layer it, or pour it on top. But every option had problems. Swirls mostly melted away while baking or cracked if I used more caramel. In no-bake versions, the swirls and layers slid apart, and mixing caramel through often stopped the cheesecake setting properly. Pouring it on top just dripped off unless it was thick enough to glue your teeth together.
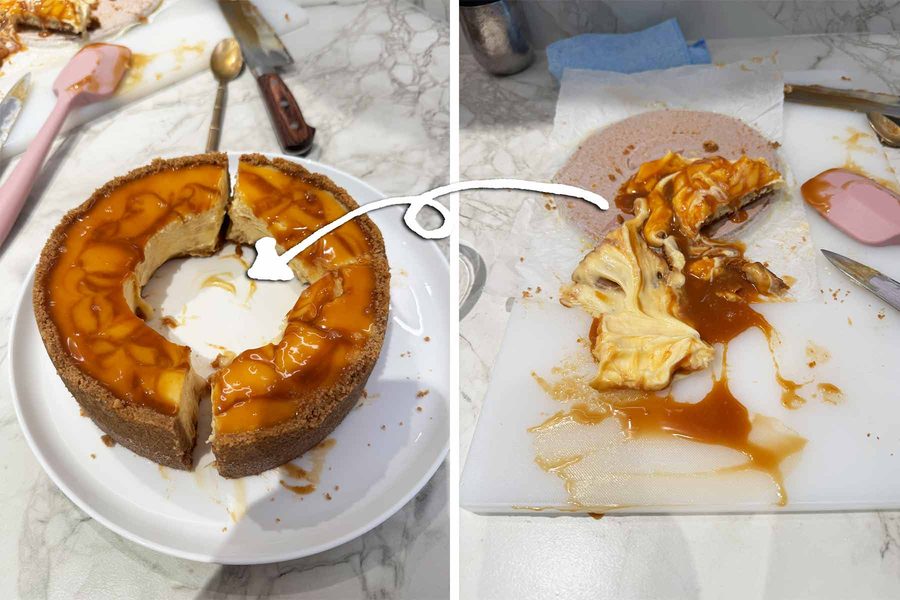
And while I originally wanted a tall round cheesecake, it simply couldn’t handle the weight of the caramel. Here’s one disaster. No, I was not making bundt-cheesecake!!! The middle just wouldn’t set with the amount of caramel I insisted on putting in! 😩
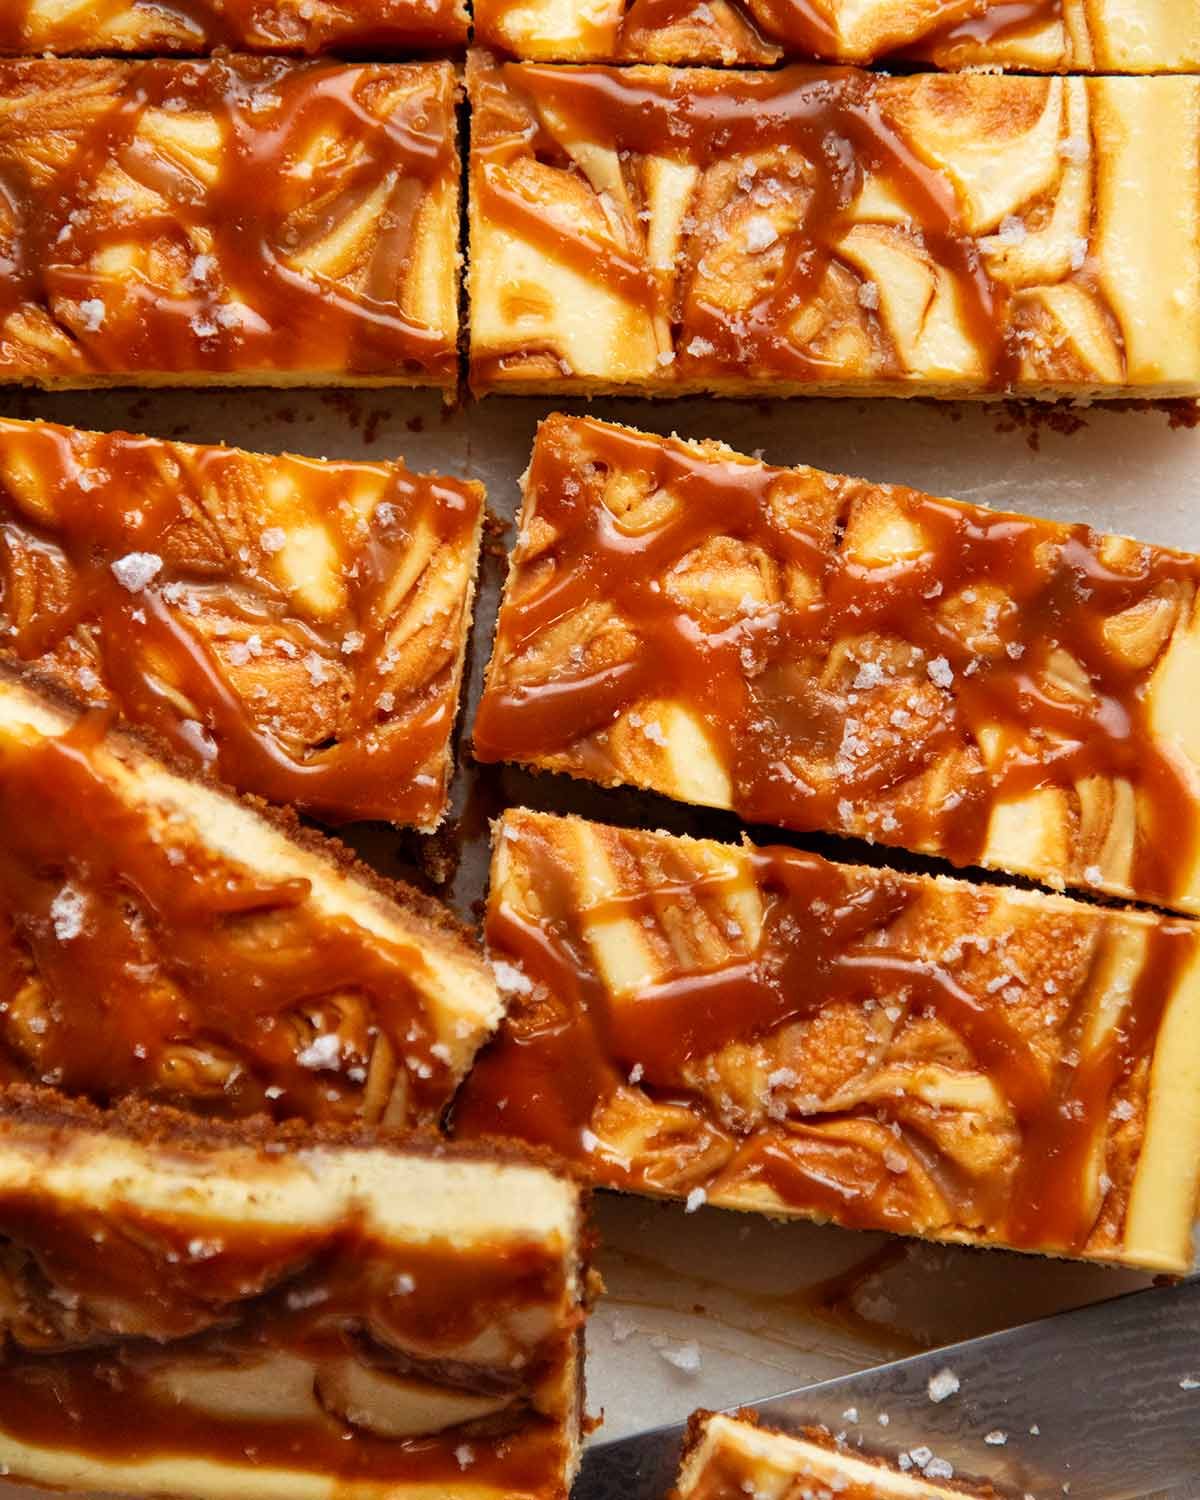
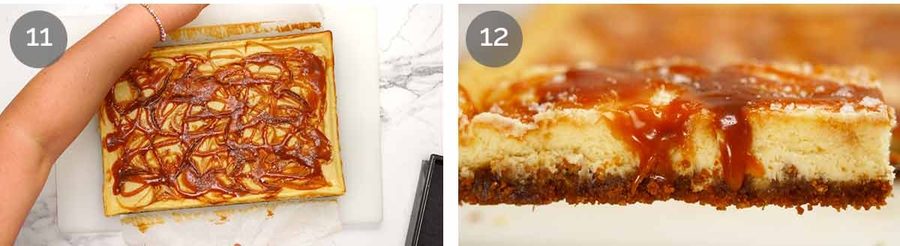
In the end, flavour won over looks. I went with a thinner, larger slab with swirls (excellent caramel-to-cheesecake ratio), embraced the cracks, filled them with caramel and drizzled more on top.
It might not be the most beautiful cheesecake around, but every bite of creamy cheesecake is loaded with salted caramel – and to me, that’s what really matters. Perfectly Imperfect!
PS. Watch everyone inspecting the slices to grab the one with the most cracks – because those have the most caramel.😉
Ingredients in Salted Caramel Cheesecake
Today’s salted caramel cheesecake is made with my classic baked cheesecake filling, tried and tested by many in the years since I first published it, including all sorts of flavour variations. It’s luscious and creamy but also light and aerated, that elusive combination of indulgent without being overly rich.
Here’s what you need to make this Salted Caramel cheesecake.
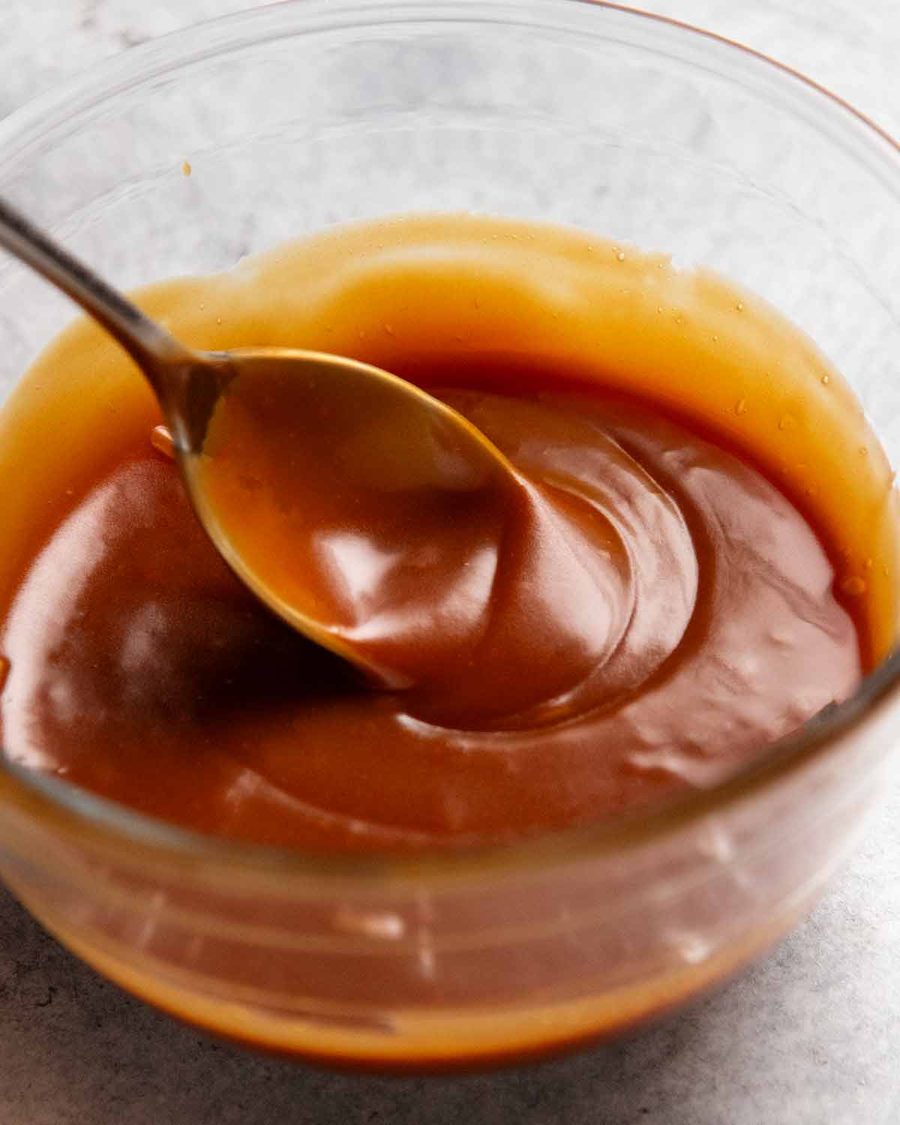
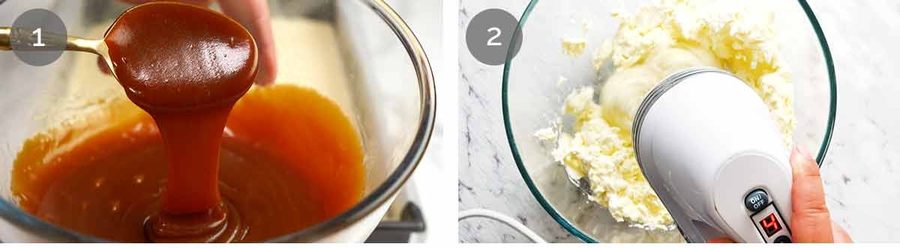
1. salted caramel sauce
Please don’t be tempted to use store bought. Besides the flavour being way, way superior, the thickness of the caramel here is made especially to ensure it doesn’t sink in the cheesecake batter which can prevent the cheesecake from setting properly, or the swirls sink.
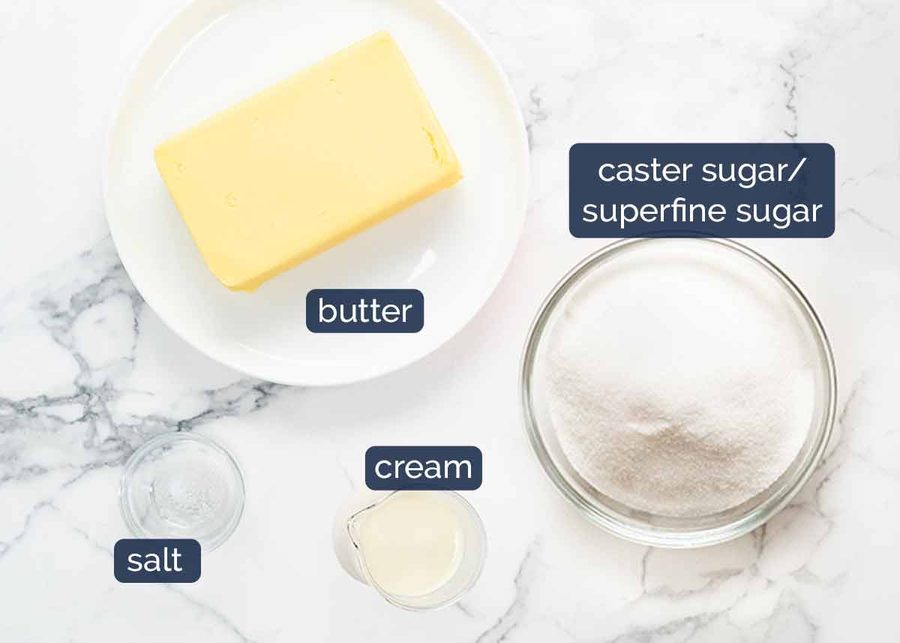
Caster sugar / superfine sugar – These grains are finer than regular sugar / granulated sugar so it melts more evenly and provides a very good insurance policy against the risk of the toffee burning (notorious problem when making caramel). Regular sugar / granulated white sugar will work too, just keep a closer eye on the toffee as the sugar melts to ensure it doesn’t burn in patches (which will spoil the whole batch).
Cream – Thickened cream / heavy cream is my default but it any full fat pouring cream is fine. Don’t use clotted cream or thick scoop-able cream, it will make the caramel too thick.
Butter – Cold butter, cut into cubes. (PS I think I picked up the wrong block of butter for the ingredients shot, that block is way too big! 😂 We only use 75g (5 tablespoons).
Salt – I use cooking salt / kosher salt. If you’ve only got table salt, decrease the amount by 50%. If you’re using flakes, increase by 50%.
2. biscoff cheesecake base
I chose Biscoff for the base because it has built-in caramely flavours. However, it is pricier than other common biscuits used for cheesecake bases (and annoyingly, you really do need to get 2 packets though you’ll only use a bit of the 2nd packet) so see below for other biscuit options that are more economical options.
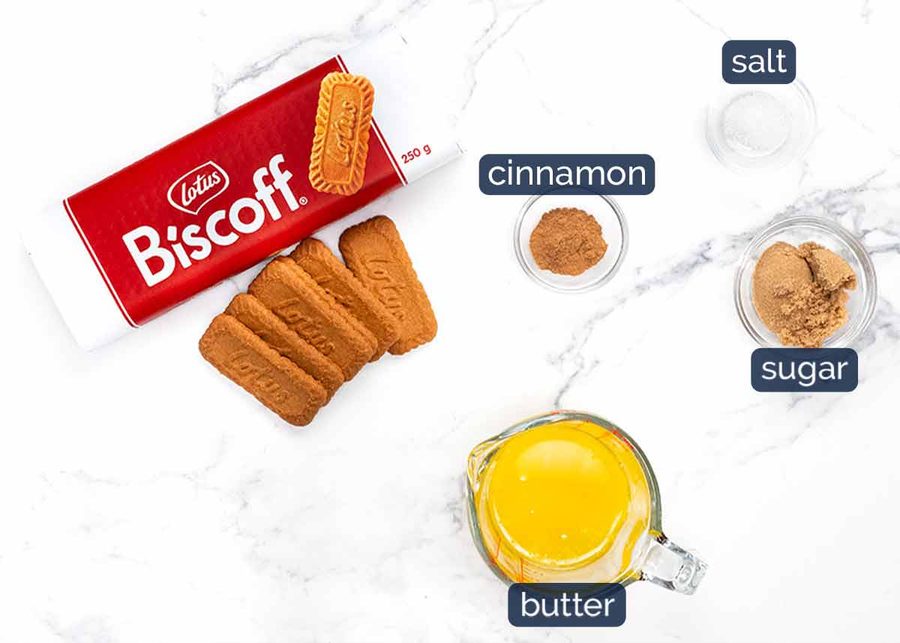
Biscoff – As noted above, I chose this because it has a lovely caramely flavour. Also, it’s very “in”, especially with the under 25 crowd – I know, I know, I’m so cool. 😂 However, it comes with a price tag, so feel free to use another plain biscuit.
Other biscuit options – Marie Crackers (common cheesecake base here in Australia), digestives, graham crackers (US).
Avoid biscuits/cookies coated with chocolate, or sandwiched with filling (like Oreos) because it may affect how well this no-bake base sets.
Butter – This is what holds the cheesecake base together and makes it solidify once baked.
Sugar – Just a smidge, for a boost of sweetness in the base.
Cinnamon – For an extra touch of extra flavour. If using a plain biscuit, double it.
Pinch of salt – To bring out the flavours!
3. cheesecake filling
The cheesecake filling is the same as my classic baked cheesecake, minus the lemon (odd with caramel) and minus the flour. I use a tiny smidge of flour in tall round cheesecakes to help with stability and prevent collapsing. No need to worry about that with a thinner slab cheesecake.
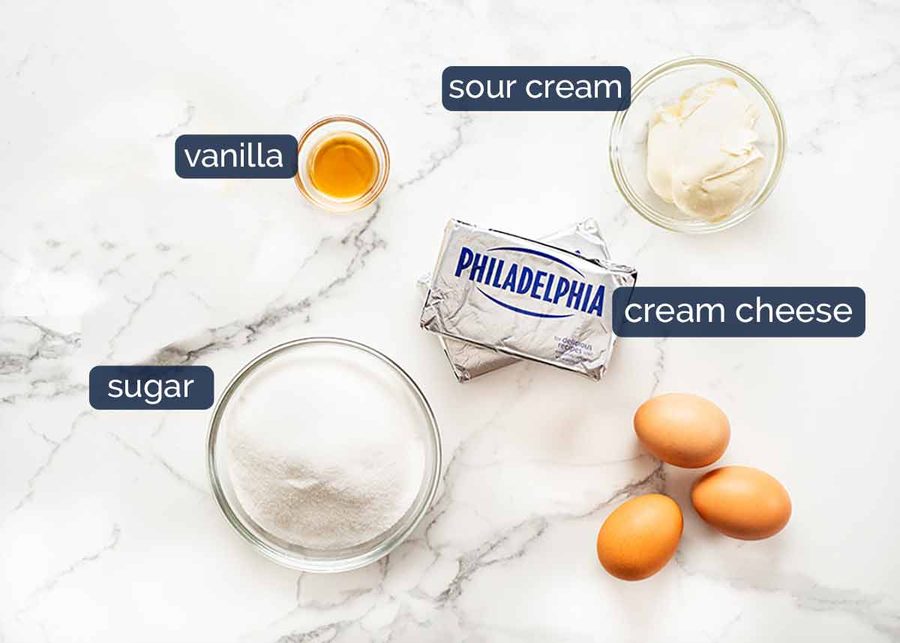
Cream cheese – I always use Philadelphia but if you’ve had success with another brand, feel free to use that.
Softened to room temperature – Take it out of the fridge at least 30 minutes prior so it is softened and will easily beat into a smooth fluffy mixture.
Blocks not tubs – This recipe calls for cream cheese blocks which are firmer than cream cheese in tubs which are softer as they are designed for spreading. If you can only get tubs, use that (same amount per recipe) and skip the sour cream in the ingredients.
Sugar – I use caster sugar (superfine sugar) which is my default for baking, but you can use regular sugar / granulated white sugar if that’s what you’ve got.
Vanilla – Please use vanilla extract which is real flavour extracted from vanilla beans (hence the name!) rather than vanilla essence which is imitation.
Sour cream – This lightens the filling so it’s not overly dense and rich. A thick plain yogurt could be substituted.
Large eggs at room temperature – Use eggs from a carton labelled “large eggs” which are ~55g /2 oz each, and bring them to room temperature before using so they incorporate into the batter. Trying to mix fridge cold eggs into cheesecake batter is a disaster – it solidifies the cream cheese so you end up with a gazillion lumps in the mixture. How do you think I know this?? 🤭 See here for what to do if you have eggs much larger or smaller.
How to make Salted Caramel Cheesecake
This cheesecake takes around 9 hours from start to finish, factoring in 7 hours of cooling and setting time (in oven then fridge), 1 hour of caramel cooling time, plus baking and preparation time. So start it early in the morning if you want to serve it for dinner. I usually make it the day before and refrigerate overnight.
1. Salted Caramel sauce – start 1 hour prior
Make the sauce first as it needs to fully cool to room temperature before using which can take up to 1 hour. You can also make caramel sauce ahead as it will keep in the fridge for 2 weeks.
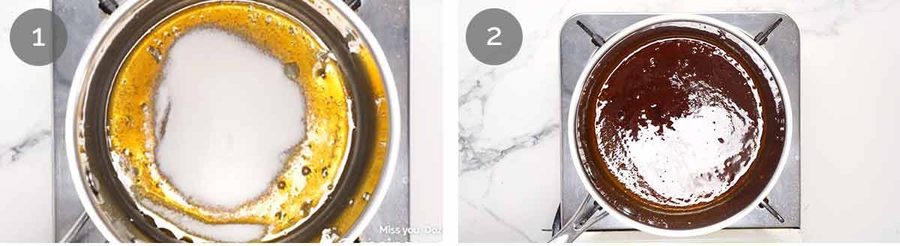
Melt sugar in 4 batches – Put a saucepan over medium high heat (or medium if your stove is strong). Put in 1/4 of the sugar and let it melt (give it a stir if it needs encouragement to melt evenly). Once melted, add another 1/4, let it melt, and repeat twice more. Doing it this way reduces the risk of burning the caramel – notorious problem!
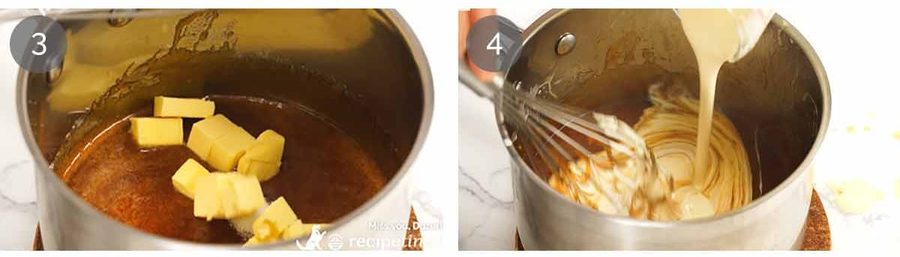
Amber colour – When the sugar has melted into a liquid, leave it on the stove for a minute or two until it becomes an amber colour. Don’t walk away as it will go from golden toffee to burnt in a flash!
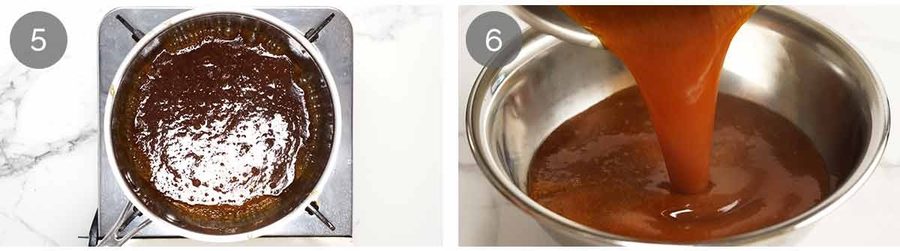
Butter – Remove the saucepan from the stove. Add the butter and salt, then whisk until the butter is melted. It’s ok if it doesn’t fully incorporate into the toffee at this stage.
Cream – The slowly pour in one third of the cream, taking care as it will bubble and steam a bit. Whisk that in, then once it’s incorporated you can whisk in the rest of the cream (it won’t steam as the caramel is cooler now).
Simmer – Return the saucepan to the stove. Once you see bubbles, let it simmer for 1 minute, stirring every now and then.
Pour the salted caramel into a bowl.
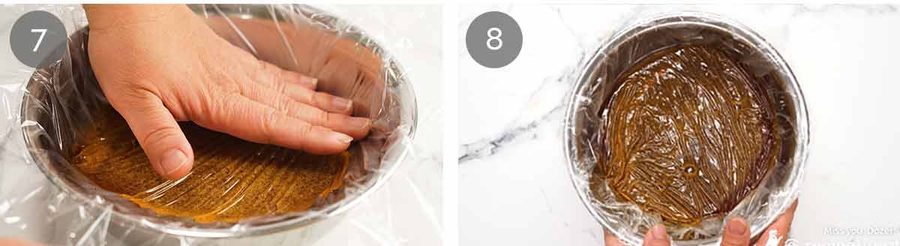
Cover with cling wrap touching the surface to prevent it from forming a skin.
Cool on the counter. Make sure it is fully cool before using – about 1 hour. You can also refrigerate up to two weeks, but make sure it is fully at room temperature before using for swirls because when cold it is thicker so it will sink in the batter.
2. the cheesecake
The nice thing about slab cheesecakes is that they’re much easier to assemble than tall round cheesecakes with biscuit walls. They’re also less prone to collapsing, and cracks aren’t a problem here, remember? We are embracing them – and filling them with caramel!
Room temperature caramel – Make sure your caramel is at room temperature, not fridge cold. Cold caramel is thicker and it will sink in the batter, plus the cold caramel will bring down the temperature of the cheesecake batter so it takes longer to bake.
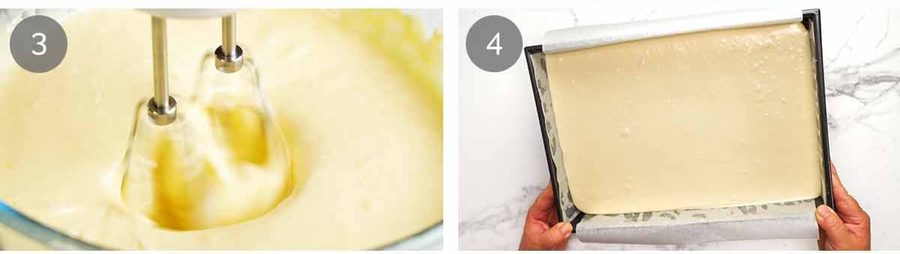
Make batter – Beat the cream cheese just until it is smooth and creamy. The goal is to minimise beating as excessive whipping will incorporate air bubbles into the filling which are unsightly.
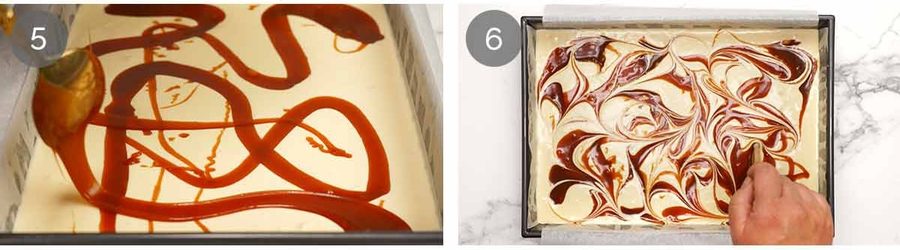
Finish batter – Add the sour cream, sugar, vanilla and salt. Beat just until incorporated. Then beat the eggs in one at a time, beating for the minimum time until incorporated and the batter is smooth.
Pour the batter onto the prepared base and spread out evenly.
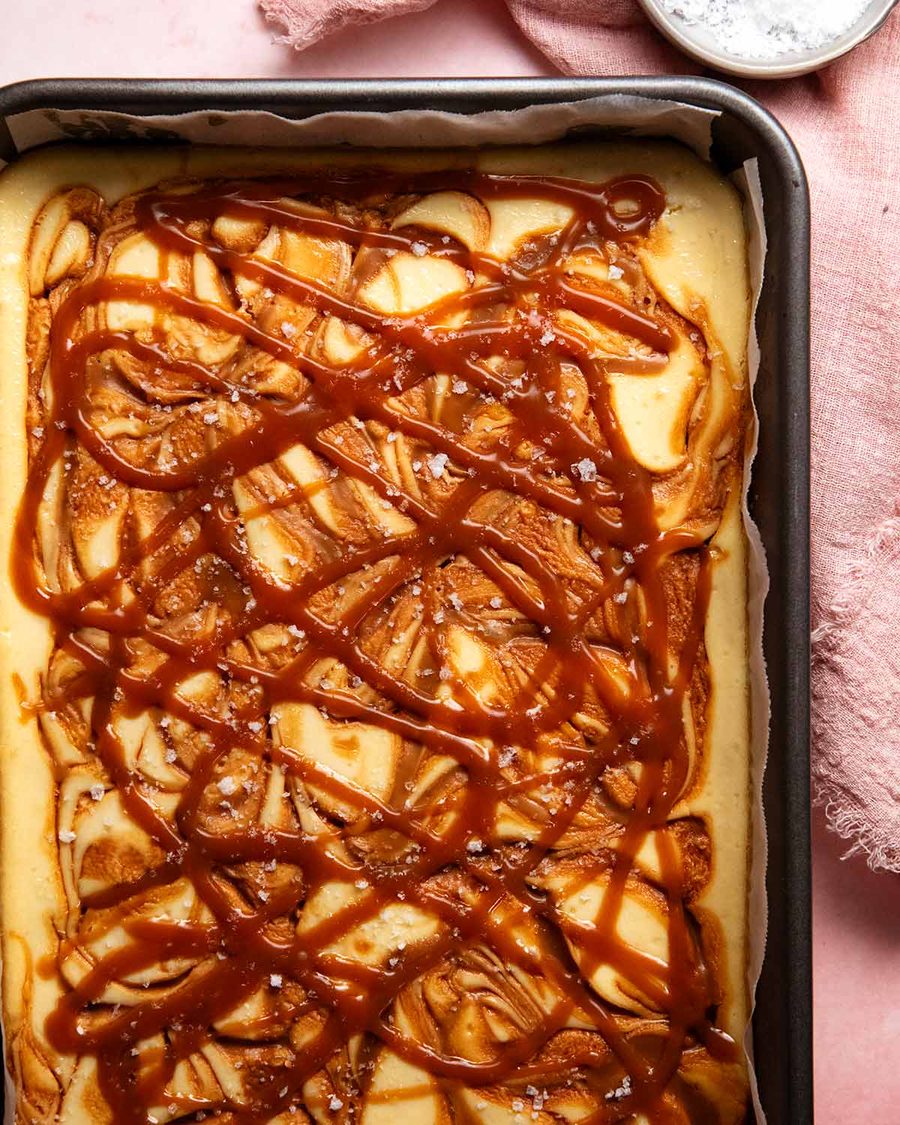
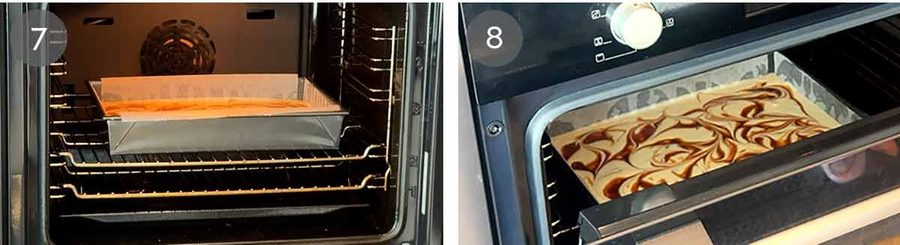
Swirling – We are using half the caramel for the swirls, reserve the other half for decorating. Give the caramel a good mix before using. Then using a spoon, do big dollops and streaks randomly across the surface of the batter. Random is the key word here, don’t try to make a neat or even pattern!
Swirls – Then use a chopstick or butterknife (something thin) to make swirls all across the surface. Don’t do too many swirls as then you end up mixing the caramel into the batter which may compromise how well the cheesecake sets. And don’t fret about pretty swirls as we are finishing with a drizzle which mostly covers it! The purpose of swirling is mainly as a means to spread the caramel across the cheesecake, in a pretty-ish way.
Bake for 35 minutes in a 160°C/320°F (140°C fan-forced) oven. The cheesecake should feel a bit soft and un-cooked in the middle (prod to check), it will firm up as it cools.
Cool in the oven with the door open for an hour. During this time, some of the larger swirls will open up into cracks. Embrace these, do not fret! We are going to fill these with caramel in the next step – may you have many cracks on your cheesecake!

Fill cracks and drizzle – Use most of the reserved salted caramel to fill the cracks and drizzle randomly (and generously!) across the surface.
Refrigerate to set – Then refrigerate for at least 6 hours to let the cheesecake set. I usually leave it overnight, to be extra sure.
Remove the cheesecake using the excess paper overhang.
Sprinkle with sea salt flakes, then cut to serve!
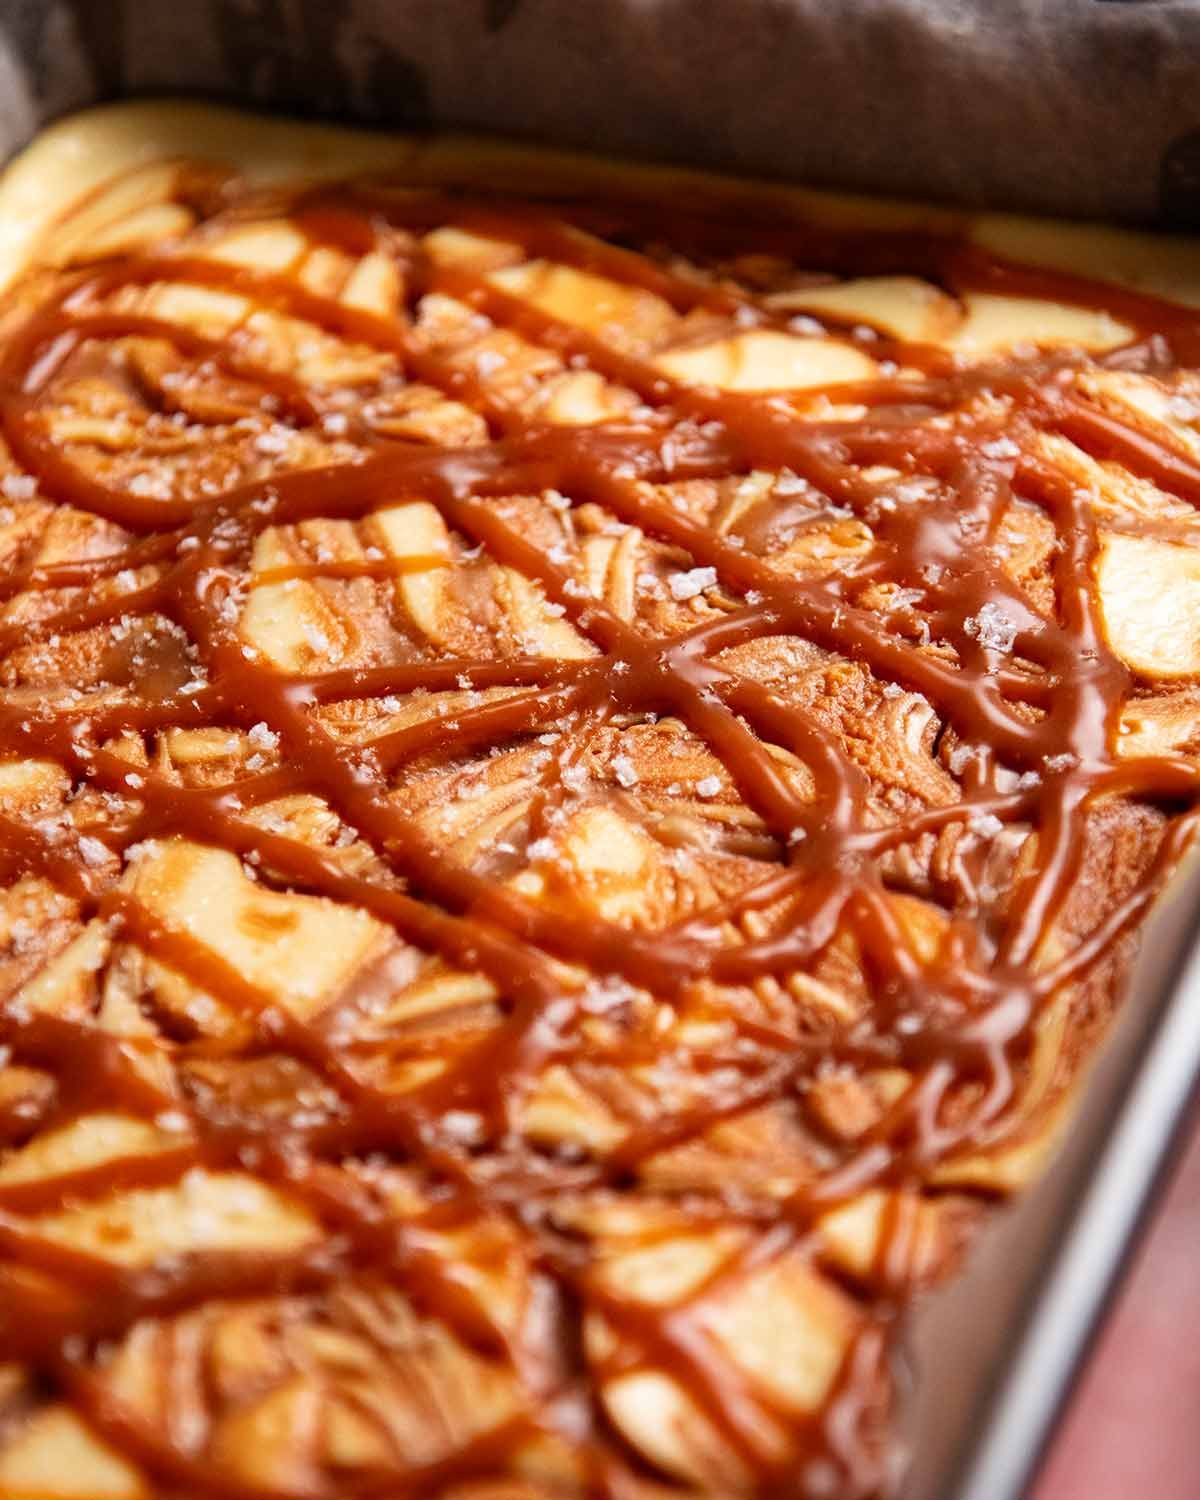
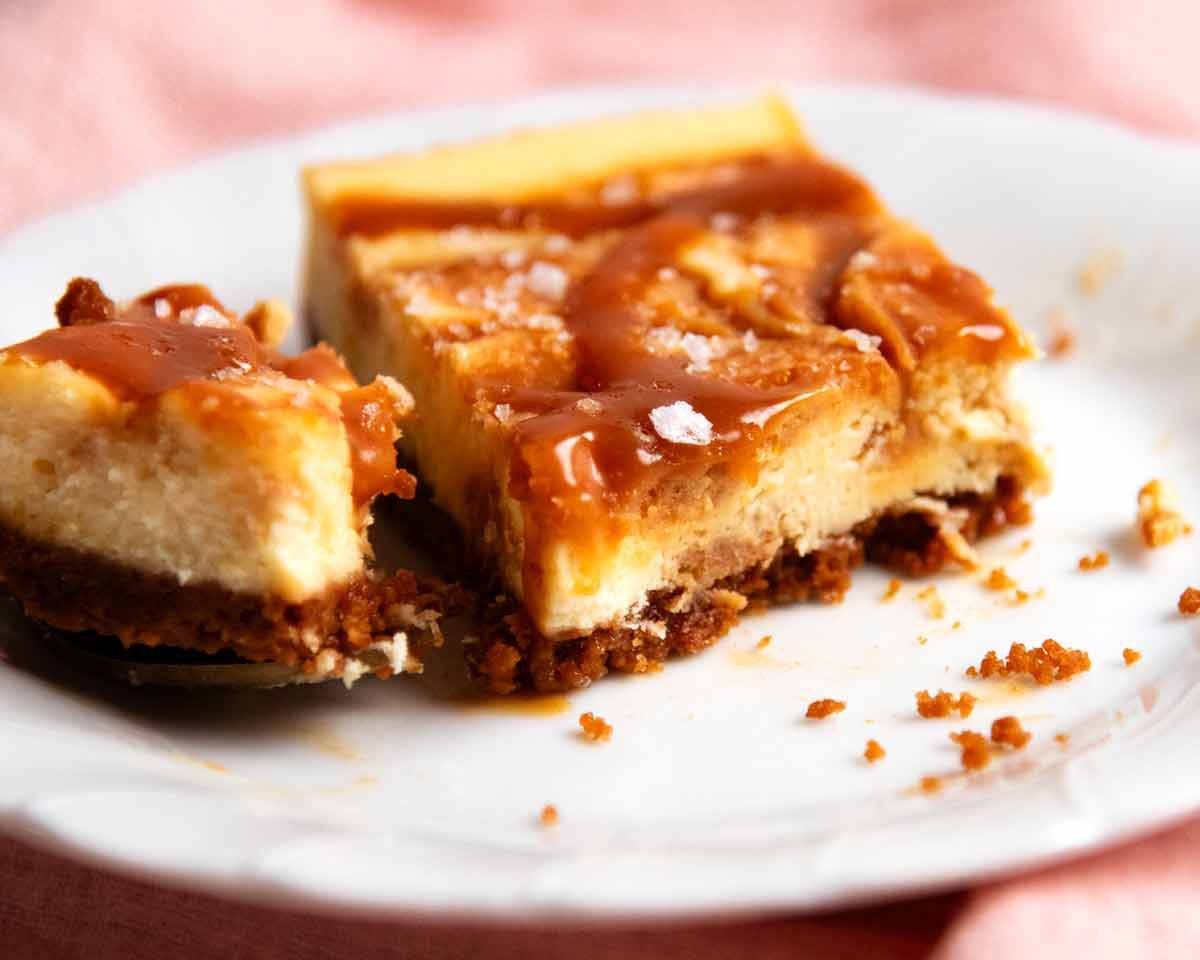
Cut the cheesecake into whatever size pieces you desire. You’ll see in the video that I cut it into 16 pieces which I think is a decent serving size given it’s richer than a regular cheesecake because of the caramel. I usually cut 12 standard slices out of a round cheesecake that is made with the same amount of cheesecake batter.
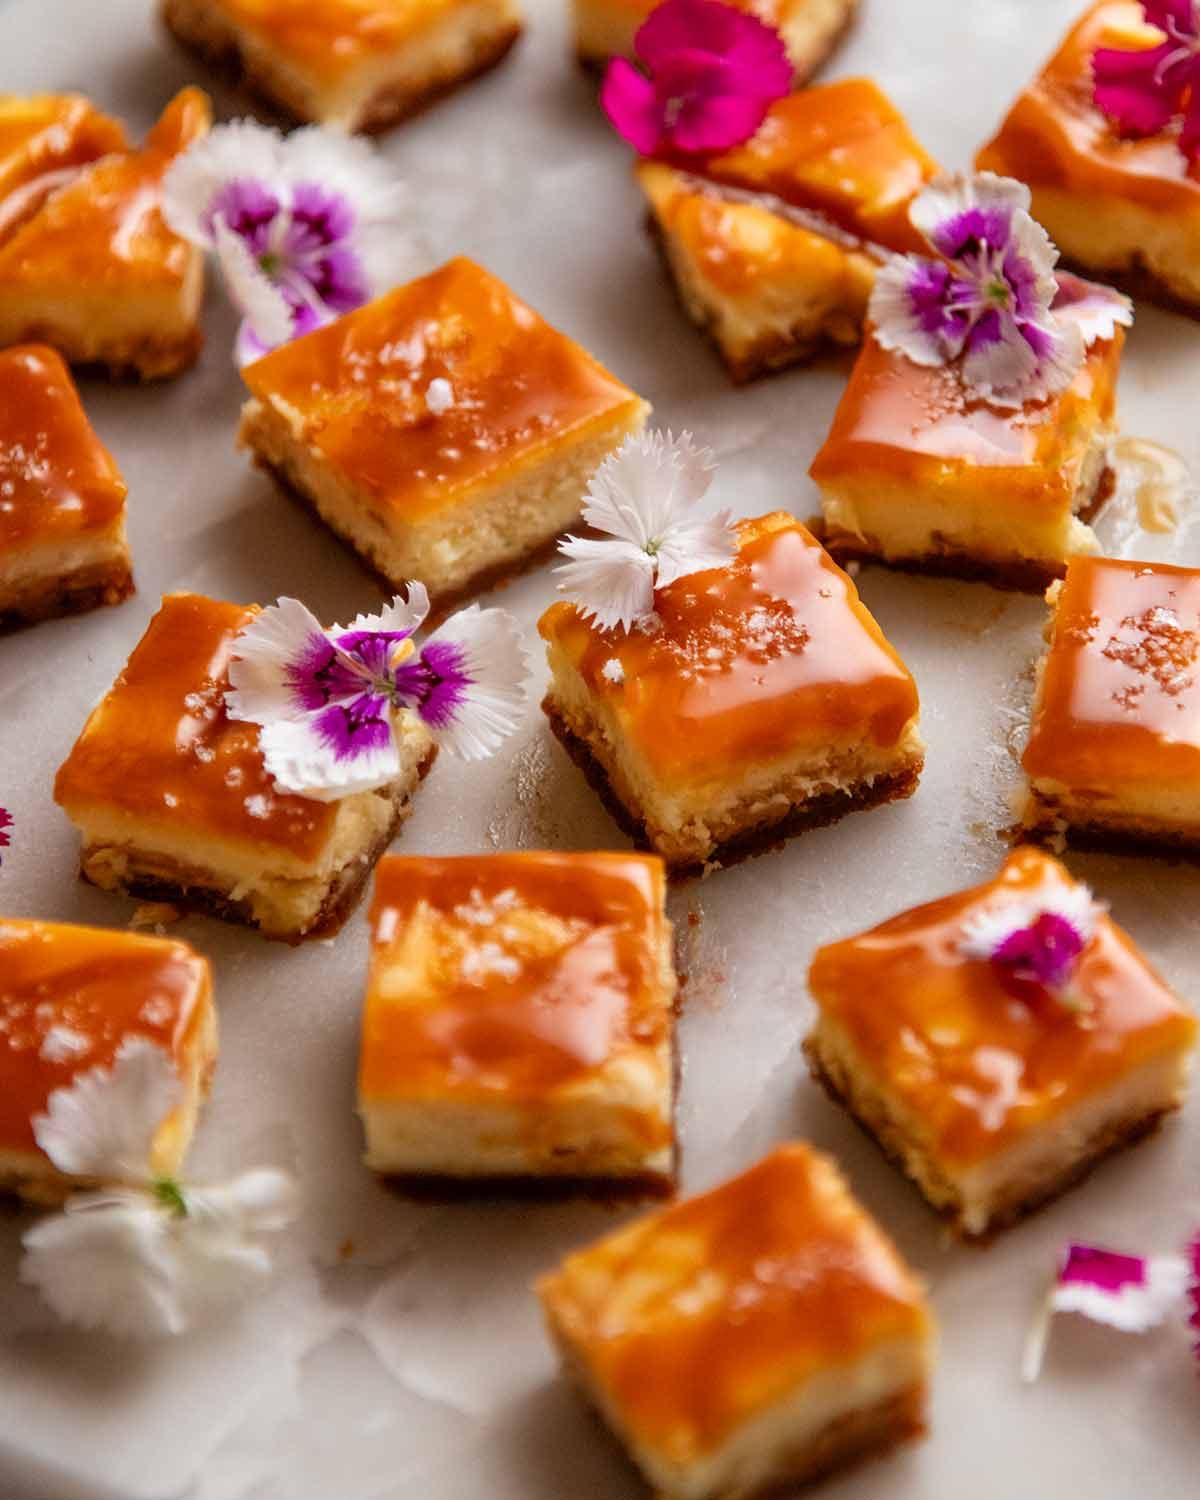
You could also do petit four bite-size mini servings – you can get 77 pieces that are 3cm squares (1.2″), or 40 pieces that are 4 cm squares (1.6″). Spread them out on a platter with some strawberries or edible flowers for colour – so pretty!
Hope you enjoy. – Nagi x
Watch how to make it
Hungry for more? Subscribe to my newsletter and follow along on Facebook, Pinterest and Instagram for all of the latest updates.

Salted Caramel Cheesecake
Ingredients
Salted Caramel:
- 1 cup caster sugar / superfine sugar (Note 1)
- 75g / 5 tbsp unsalted butter , cold, cut into ~ 1cm / 0.4" cubes
- 1/2 cup thickened cream / heavy cream , or any full-fat pourable cream
- 1/2 tsp cooking salt / kosher salt (halve for table salt, + 50% for salt flakes)
Biscoff Biscuit Base:
- 300g/10 oz Biscoff cookies (38 pieces) or other plain biscuit/cookies 2 1/2 cups crumbs) (Note 2)
- 1/2 tsp cinnamon powder
- 1 tbsp brown sugar
- 120g / 8 tbsp unsalted butter , melted
- Pinch of salt
Cheesecake Filling:
- 1 lb / 500g cream cheese , full fat, softened to room temperature (Note 3 – take note UK/Europe!)
- 1 tsp vanilla extract
- 1/2 cup sour cream , full fat (substitute with yogurt)
- 3/4 cup caster sugar / superfine sugar (or regular white sugar / granulated sugar)
- 3 large eggs , at room temperature (~55g/2oz in-shell)
- 1/2 of the salted caramel sauce (Note 4 for store-bought)
- 1/8 tsp cooking salt / kosher salt
Decorating:
- 1/2 of the salted caramel sauce (Note 4 for store-bought)
- 1 tsp sea salt flakes (Note 5)
Instructions
Salted Caramel for Cheesecake (start this 1 hour prior):
- Melt sugar in 4 batches – Spread 1/4 of the sugar in a medium saucepan over medium high heat (or medium, if it's a strong stove). Let it melt, stirring if needed, then add another 1/4 of the sugar, melt, then repeat twice more.
- Amber colour – Once all the sugar has melted, leave it on the stove for 1 – 2 minutes until it becomes an amber colour. ⚠️DON'T WALK AWAY! Sugar burns easily. 🙂
- Make it caramel! Remove the saucepan off the stove. Add the salt and butter, whisk until melted (it may not combine with the sugar, that's ok). Then slowly and carefully pour in ~1/3 of the cream (⚠️ it will steam and bubble a bit). Whisk that to combine, then whisk in remaining cream (it won't bubble).
- Simmer – Return to the stove, still on medium high. Once you see bubbles, let it simmer for 1 minute, stirring and scraping down sides as needed.
- Cool 1 hour – Pour into a bowl. Cover with cling wrap touching the surface (to prevent a skin from forming). Let it fully cool on the counter before using – about 1 hour.
Preparation:
- Preheat oven to 160°C/320°F (140°C fan-forced). Place shelf in middle of oven.
- Line pan: Lightly grease a 23 x 33cm / 9 x 13" metal pan with unsalted butter. Line with baking paper with overhang to lift the cheesecake out at the end.
Cheesecake Biscuit Base:
- Blitz – Break up biscuits roughly by hand and place in a food processor. Blitz until fine crumbs. Add butter, briefly blitz until dispersed and it resembles wet sand. (Note 6)
- Pour into the prepared pan, then firmly press it evenly across the base (base only, not the sides).
Cheesecake filling:
- Cream cheese: Use an electric beater or stand mixer fitted with the paddle (not whisk). Beat the cream cheese just until smooth, no longer than 20 seconds on speed 4. (You want to minimise air bubbles in the batter as they are unsightly).
- Add vanilla, sour cream, sugar and salt. Beat until just combined.
- Add eggs one at a time, beating in between for just 5 seconds. After the last egg, beat as needed until batter is smooth – but stop beating immediately once smooth.
- Pour the mixture onto the base and spread out evenly.
- Caramel swirls – Use a spoon to randomly dollop half the salted caramel you made across the surface. Then use a chopstick to make some swirls. Not too many – we don't want to mix the caramel into the batter, you just want to spread it across the surface. Don't worry about prettiness (we drizzle more on at the end).
- Bake for 35 minutes. The middle should still be a bit soft, but not like a waterbed (ie runny batter under surface skin).
- Cool in oven – Cool the cheesecake in the oven with the door open approx 20 cm / 8" for about 1 hour (Note 6)
- Fill cracks and decorate – As it cools, some of the swirls will open up into cracks. Use a teaspoon to fill these with salted caramel, then use most of the remaining caramel to do bold drizzles across all across the surface, I use about 3/4 of it (use leftover for serving, or another use).
- Fridge set – Refrigerate the cheesecake in the pan for 6 hours+ or overnight.
- Remove & cut – To remove, lift the cheesecake out using the paper overhang. Sprinkle with salt flakes. Cut into however many pieces you desire – 16 bars (pictured), or into 40 x 4cm or 77 x 3cm Petit Four size squares (adorable!).
Recipe Notes:
- The salted caramel has been designed especially for this recipe (consistency is key), so I don’t recommend using store bought (see Note 4). 🙂
- Ensure the cream cheese, eggs and sour cream are at room temperature, else the cheesecake batter will be lumpy.
- Don’t be tempted to convert this into a taller round cheesecake, it can’t hold up to the amount of caramel incorporated into this (I tried multiple times).
- A Biscoff cookie base is heavenly in this, but feel free to use any plain cookie – Arnott’s Marie, Digestives and Graham Crackers are ones I use regularly!
1. Caster sugar / superfine sugar – The grains are finer than regular sugar (granulated sugar) so they melt more easily and evenly, reducing the risk of burning (notorious caramel problem!). Regular sugar is fine too, just take extra care as it melts less evenly. Use a chopstick to stir the sugar (small surface area = less caramel mess). Yes, I know I use a wooden spoon in the video – silly me! Note: Crystallisation (a common toffee problem) shouldn’t occur here because the butter and cream fats stabilise the melted sugar. 2. Biscoff base – You’ll need to get 2 standard Biscoff packets (250g / 8.8oz each, 32 biscuits in each), and to use 1 full packet plus 6 extra biscuits (this is 300g/10 oz). Substitute with any other plain sweet biscuits (ie no chocolate coating or filling like Oreos), like Marie crackers, digestives, graham crackers*. If the biscuit you use doesn’t hold together when pinched after mixing in the butter, just add a bit of extra butter until it does (some types are a little drier). * Graham Crackers (US): Use ~ 42 squares / 21 full sheets, or use packet crumbs (2 1/2 cups). 3. Cream Cheese – In the UK and some parts of Europe, block cream cheese isn’t available. If you can only get spreadable cream cheese in tubs (softer than block), skip the sour cream. 4. Salted caramel sauce – I don’t recommend store bought caramel because it varies in thickness, often it’s much thinner. This recipe makes caramel thick enough so the swirls stay visible in the batter, and the drizzle on top sets nicely when refrigerated. Also, homemade flavour reigns supreme! Try it once and you’ll never look back. 🙂 5. Salt flakes make a wonderful finishing touch sprinkled across the surface. If you don’t have any (I get it, they are exxier than regular salt!), add an extra 1/4 tsp of cooking salt / kosher salt into the 1/2 batch of salted caramel reserved for drizzling across the surface. It really works here – the salt balances the sweetness of the caramel. 6. Crumbs: OR crush in a ziplock bag using a rolling pin or large can. After butter is added, it should just hold together when pressed between fingers. 7. Cool in oven: This minimises the caramel-swirl cracks that appear on the surface, by allowing the cheesecake to cool slowly. 8. Different measures: Cups and spoons vary slightly between countries (US and CAN are different to most of the rest of the world). I have made the cheesecake recipe using both US and Australian measures with no problems! The batter is a tried-and-tested one I use for all my baked cheesecakes. Storage – Keeps for 4 to 5 days in the fridge but the biscuit base is noticeably softer on day 3. Personally doesn’t bother me though, and I never heard any complaints, I am just nit picking! Salted caramel – Can be refrigerated for 2 weeks, but bring it to room temperature before using in this recipe (cold caramel = thicker = sinks into batter). Nutrition per slice assuming all the caramel is used (but actually, I usually have about 1/3 cup left after drizzling), for 16 slices (nice average size I think, larger gets quite rich!).
Nutrition Information:
Remembering Dozer
2019 throwback – the way Dozer greeted me every time I came home from a holiday. 😂 No polite hello, just a full-speed charge! I’d give anything for one more tackle. ❤️
My heart breaks for you.
But at least you have your memories of all the good times you had together.
Sending much love . XXX
How come i still click the dozer button first! Now ill check out recipe. Thanks nagi. Bless.
Another terrific video of you and Dozer. I will NEVER tire of your videos and photos of that sweet, loving boy!!! I hope you’re doing all right. Thank you! Please take care of yourself!
I am looking at Mr. Vader, who is lying at my feet, waiting for me to play ball with him— again. He charges at me the same way Dozer does in the video clip. They show their love so openly, perhaps that’s why we love them so dearly. There is no pretending, no holding back. Interestingly enough, we don’t hold back either. Perhaps they bring out the kid in us? My boy Norman is up there behind the rainbow bridge, with all the other 4-legged family members we have loved and lost. He is playing in the mud, waiting for me to show up one day, just as Dozer will be waiting for you. We miss them always, and they deserve to be missed. Healing doesn’t mean to forget; it means to learn to smile again.
Put so wonderfully!!! Thank you!
thank you so much. i sort of steeled myself to open this recipe, thinking that it might be the first with no Dozer content. (and of course, if and when -ever that happens will be fine if it’s right for you.) so it was a double thrill to see the video.
So Precious!
Nagi, you are such an amazing person and talented chef! How I enjoy following your cooking adventures and truly love that you continue to share memories of your sweet Dozer. The time you put into recipe testing and patience to perfect each one is so appreciated! I think your slab cheesecake is a beauty and I am excited to put my baking skills to the test with this one! Honestly, your thoroughly written instructions, ingredient explanations and substitutions, photos and videos give me the confidence to try recipes I would otherwise be too intimidated to make. Thank you, Nagi! ❤️
Salted caramel is one of my favorites! Thank you for the recipe. I was wondering what type of tabletop burner you use? I’d like to buy one to use instead of the electric cooktop for recipes like this. Thank you!
What an incredible cheese cake!! Dozer would definitely approve!
Hi Nagi, hope you are doing ok. I am so happy to see you posting pictures and videos of Dozer which I absolutely love. What wonderful memories you made together. Take care ❤️
What an AWESOME video of you and Dozer! It really brought to life his love and energy. We all love you and appreciate you sharing.
Great to see Dozen in happier days. I still miss my Waylen from 2014. Can I make this cheese cake without any crust? I make regulalr cheece cake without crust.
thank you
Eleanor
I loved the look of your salted caramel cheesecake but too too complicated for 2 of us but I enjoy lots of your other recipes.
Nagi, I were remember exactly this Dozer’s greeted yesterday, and you post it now you can read my mind😅😅
For the recipe also you really read my mind coz I’m planning to make cheesecake! Thanks Nagi!
Dear Nagi, I jumped right to the remembering Dozer . Such a good boy😍😘👍🏻 clearly the love & energy had no limit , you are his everything forever ❤️ Both my boys 10lbs of fury each 😆 were just as wildly happy when they saw bf or I … such a blessing !!🙏❤️❤️ Oh yes, thank you for such a lush caramel cheesecake recipe too 😋
This looks amazing. Will try soon when I’ve got another cheesecake fan to bake for. And I love the Dozer friendship bracelets in the video. Hope you are taking care of yourself x
Oh Nagi, you are such a naturally beautiful person 🙏 I love the video of Dozer greeting you after being away ♥️ thank you for your vulnerability 😀 my cat Ruby is improving, not “out of the woods”yet, however she is putting on weight again; a good sign to hold onto🤞
Love & best wishes
Sandra Slaven
Teary then laughing. Nothing beats a doggy greeting. No where else can you get a welcome like that 💙🐾. My daughter is a caramel freak. Told her your latest recipe and she made a mixture of these expressions 😁😛. Reckon that’s a positive reaction.
Love, love, love how you address soggy middles and making it work for gatherings Nagi! Will bake it this weekend. Also, can I say saw yr YT clip earlier and will say again..nothing like a doggy welcome and keep running and spreading joy over the rainbow bridge Dozer x
Dear Nagi. The recipe looks amazing! And thank you as always for all the effort you invest. You truly are a perfectionist. I love your memories of Dozer, so please keep them coming. It reminds me so much of my beautiful little toy poodle, who lived to 19, so for that I am truly grateful. When I would come home from school ( teacher- now retired) she would get so excited that she would pee on my shoes! 😁How I would love those days back again. The love of a dog is a love like no other. ❤️