
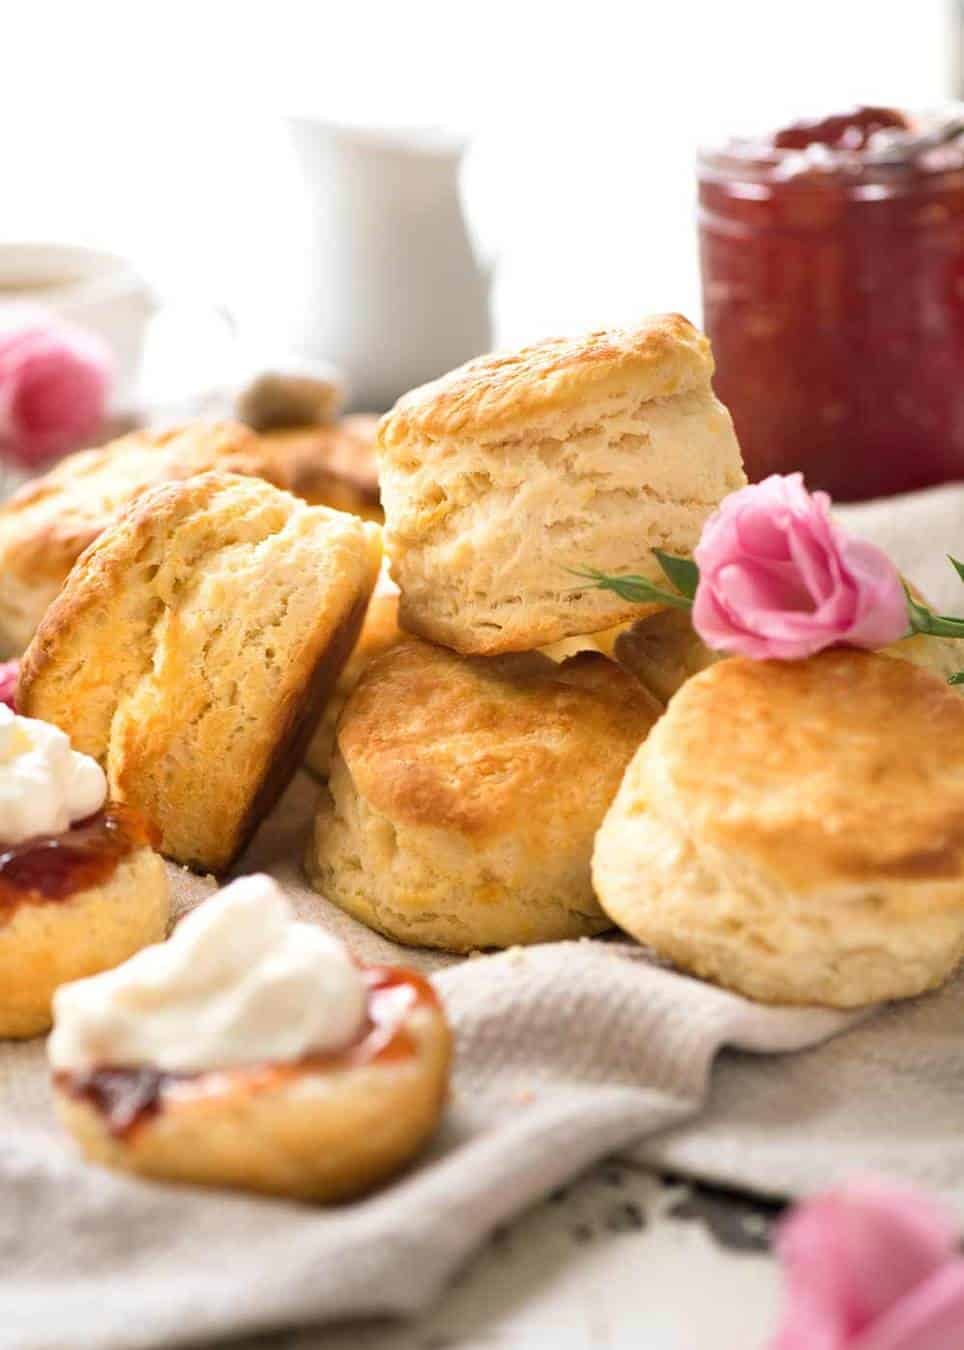
Everybody needs a great, classic scone recipe!!! These are really quick plain scones you’ll make again and again.
These scones are made with a food processor which is not only faster, it eliminates the risk of common pitfalls. Soft and fluffy insides, golden tops, serve them with copious amounts of jam and cream for the ultimate classic afternoon experience.
Classic plain scone recipe
Perhaps the simplest of all baked goods in this entire world, the humble scone surely conjures up fond memories for every Aussie. Gatherings with family and friends, school bake sales, fundraising morning teas at work, a quaint little cafe in the Southern Highlands, or your grandmother’s kitchen.
(Your grandmother, not mine. Mine lived in Tokyo and hated cooking. I would have died of shock if she ever baked anything. Or refused to eat it out of suspicion 😂).
Plain scones – made easy!
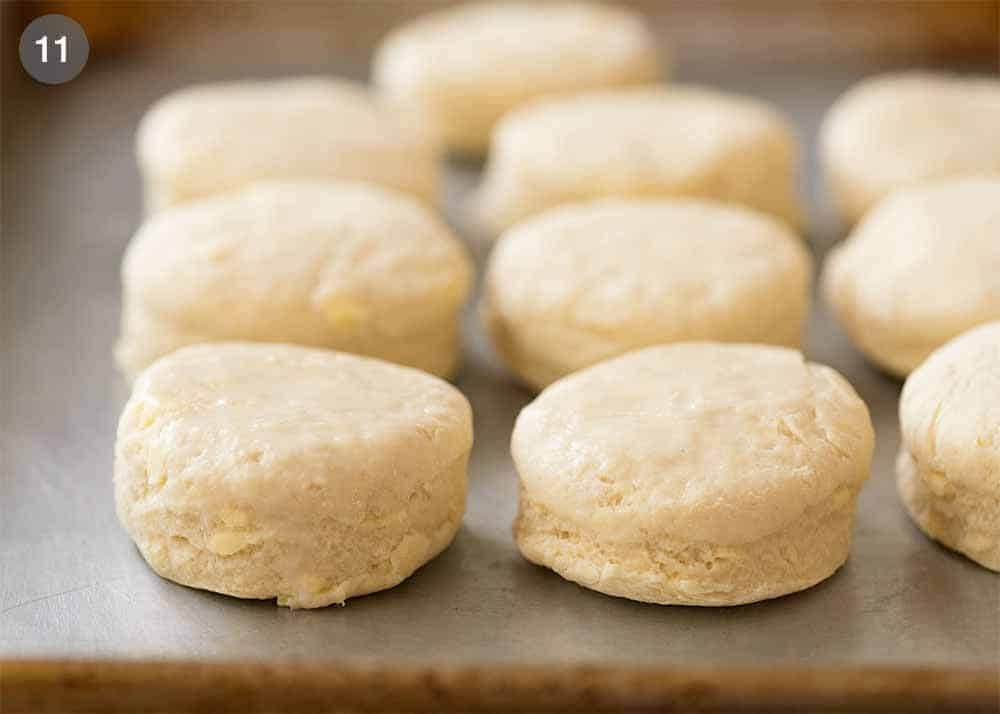
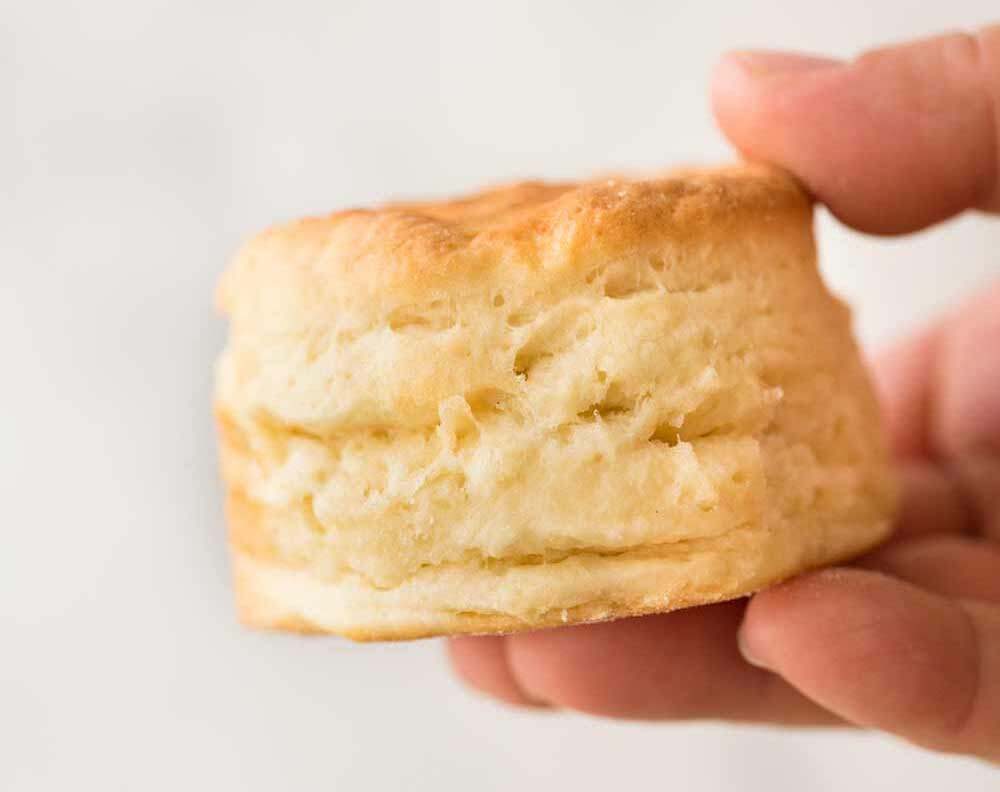
This is how I make plain scones. They are soft and fluffy on the inside, with the signature “flaky folds” when you break it open, and a golden rustic-but-not-too-rustic top:
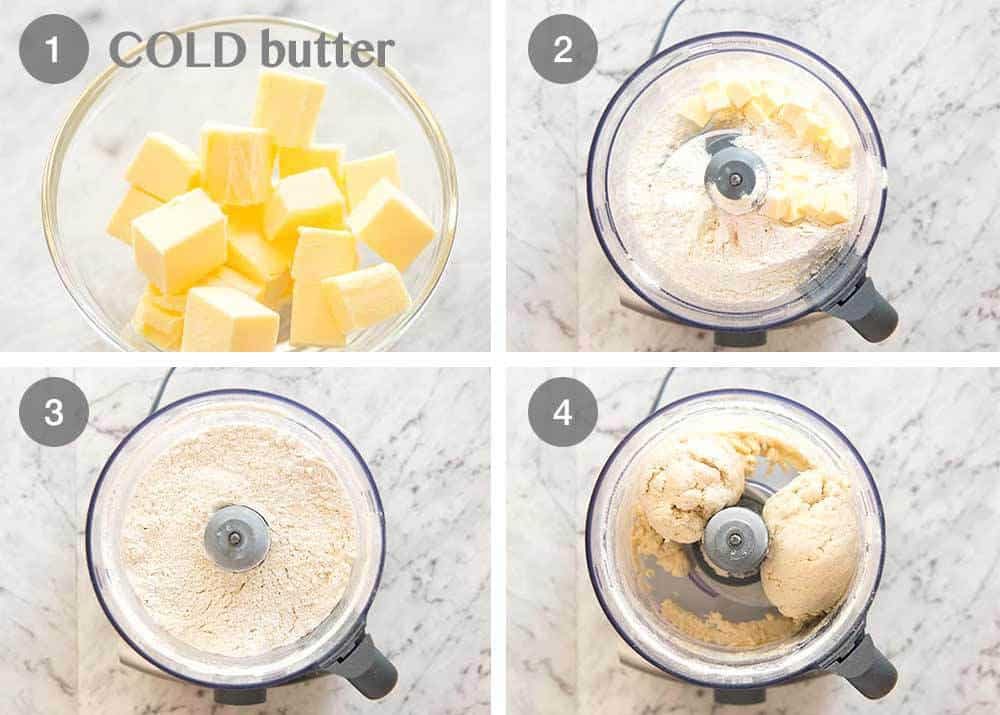
Food processor. Self raising flour and cold butter – blitz 8 seconds. Add milk – blitz 8 seconds until ball forms.
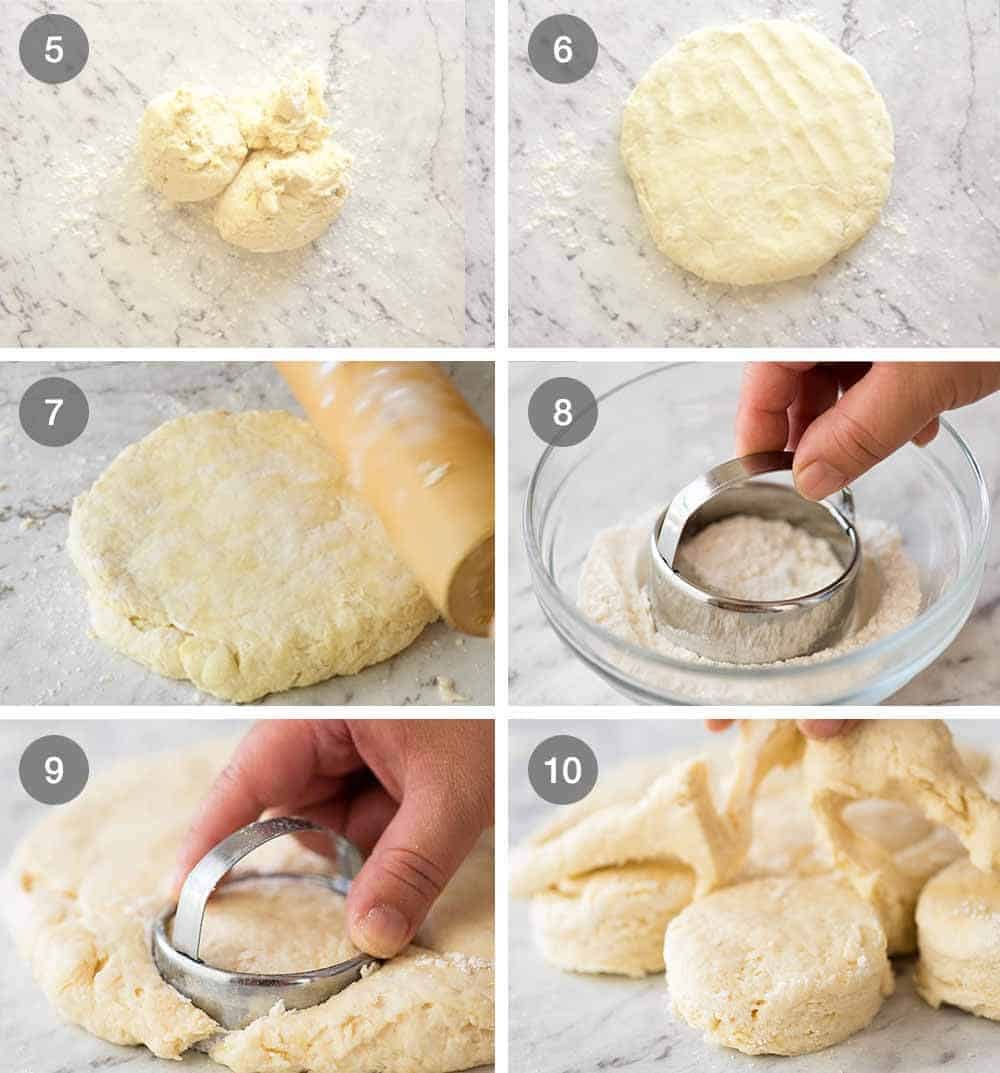
Turn dough out, knead lightly 10 times (no more), lightly roll across the top to smooth surface. Cut scones out, bake 12 minutes.
No egg. No lard. No cream. No sugar. Why complicate something that’s already perfect?
Food processor, all the way
“Food processor?”, I hear traditionalists gasp in shock.
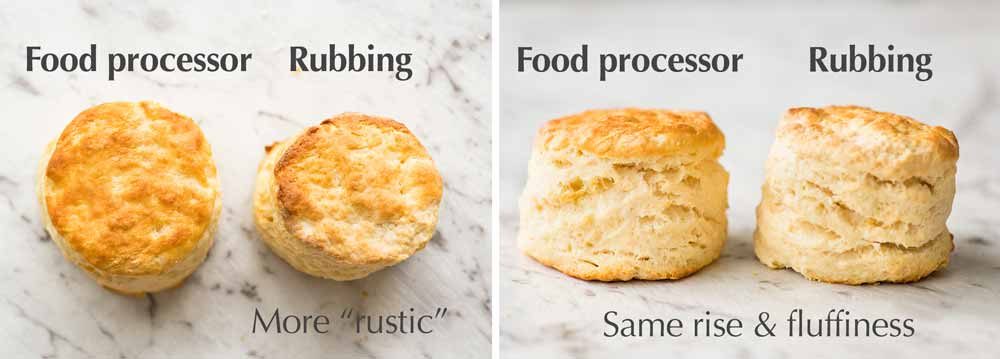
Yes. (She says firmly). Food processor. Not only is it faster with literally zero effort, it eliminates a lot of “risk factors” when it comes to making scones (eg overworking dough, melting butter with hot hands) and the dough comes together better. Softer and smoother, which means your scones will have a smoother top compared to handmade ones.
Here’s a comparison of the finger-rubbing method vs food processor. They are virtually identical in terms of rise and fluffy-factor, but the surface of the food processor scone is noticeably smoother.
Not that there’s anything wrong with a rustic top on scones. Scones are, after all, humble and rustic food, not intended to look like something from a Michelin star patisserie. 🙂
Essential Tips for making the BEST Scones!
It alarms me that I feel like I could write an entire essay on scones, so I’m restraining myself and summarising final tips for your new scone making life.
1. Resist the urge to twist – I feel like my hand always wants to twist when pressing the cutter into the dough. Resist the urge. Push straight down and pull straight back up. This will ensure your scones rise and they rise straight, not wonky.
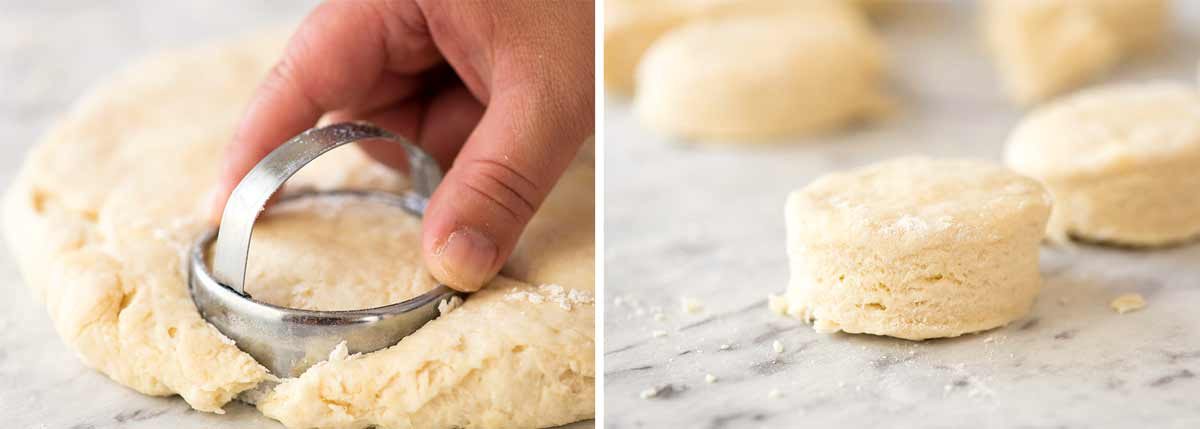
2. Don’t smooth the sides once cut – For the same reason as above. So when handling the cut scones, minimise touching the cut sides.
3. Knead 10 times, no more – Kneading the dough makes the surface of scones smoother with a more even rise. However, many recipes will tell you never to knead the dough because it would make the scones tough.
After decades of scone making, I can definitively tell you – scones can take kneading. I have found that 10 light kneads does not affect the fluffiness, rise or softness of scones at all, but it does make the scones smoother on the surface.
So 10 kneads. That’s my rule!
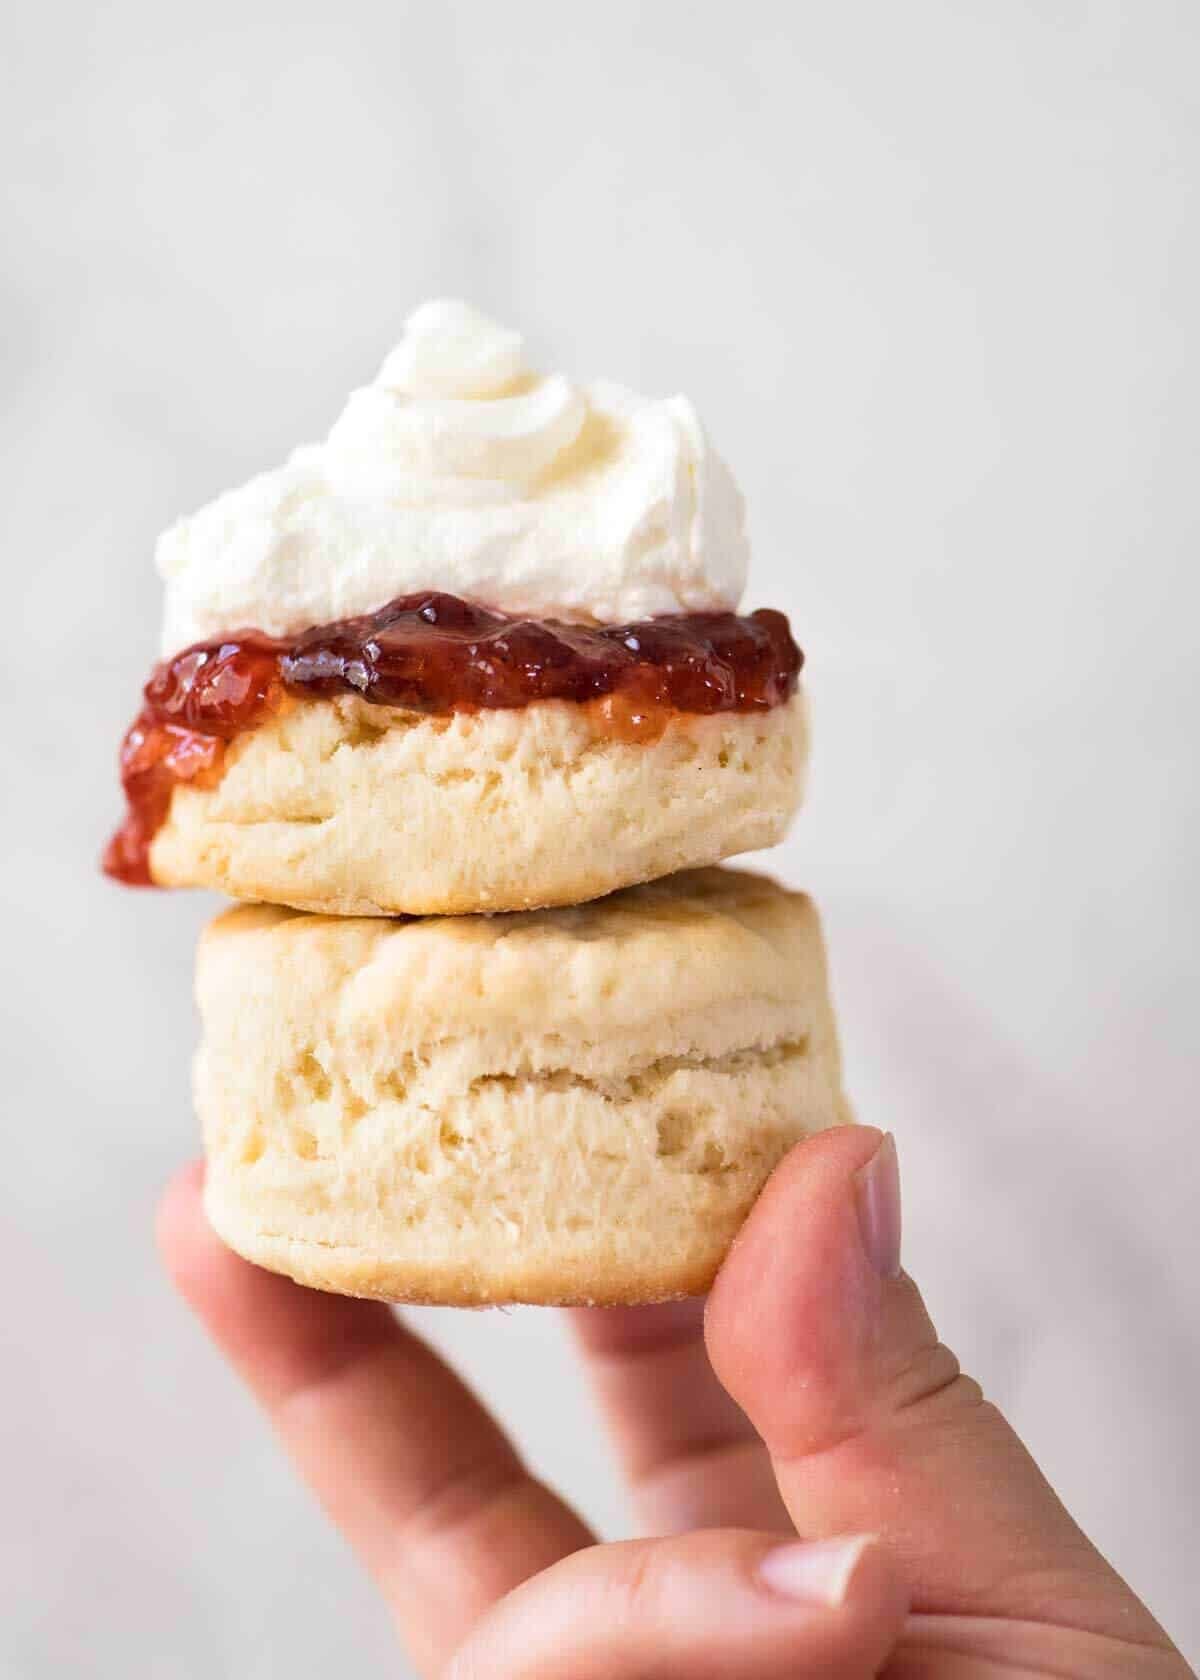
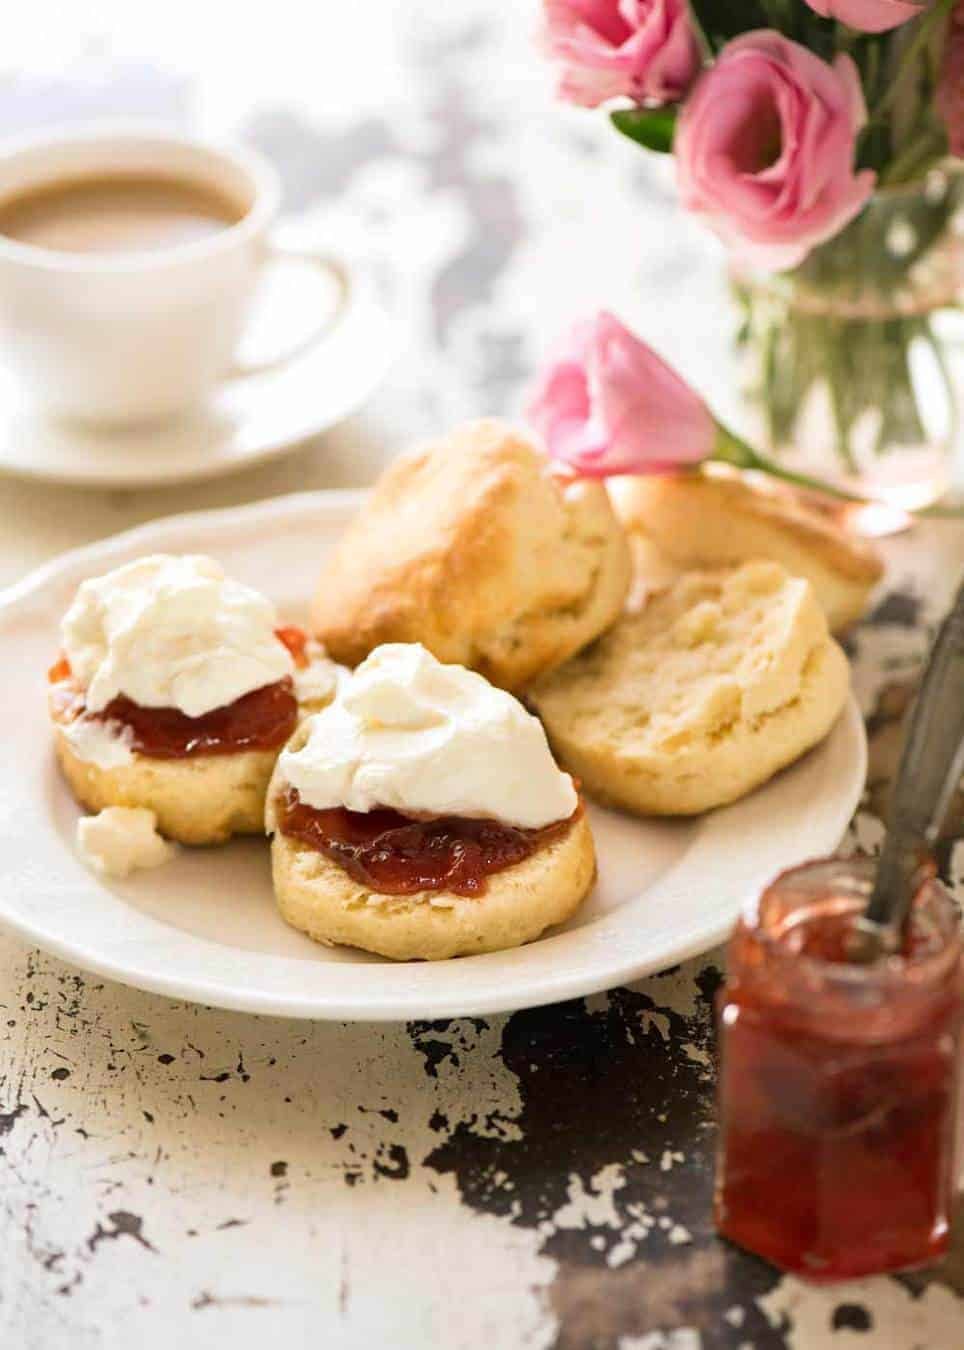
4. How do you serve scones? With copious amounts of of jam and cream, with coffee and tea. I know not of any other way. 🤷🏻♀️
Scones FAQ
What’s the difference between a biscuit and a scone? That’s biscuits as they’re known in America that look like scones! A southern classic served savoury, fabulous with grits, sausage gravy and eggs. And a comparison of this humble Aussie scone recipe with this New York Times Biscuits recipe verifies that they are indeed made the same way – just used for different purposes. 🙂
Should scones have egg? Some recipes do, but it’s much softer and fluffier without egg (because egg binds better but removes moisture from baked goods). I tried with and without side by side just to be 100% sure.
Are scones British? Yes, we Aussies have the Brits to thank for brining scones to our shores. 🙂
Why are my scones lopsided? To avoid wonky scones, see Tip #1 above: press the cutter straight up and down, do not twist. And avoid touching the sides when transferring to the baking tray.
How long to scones keep? Scones are best served on the day they are made but will keep for up to 3 days in an airtight container. Just warm them before serving to make them soft and fluffy.
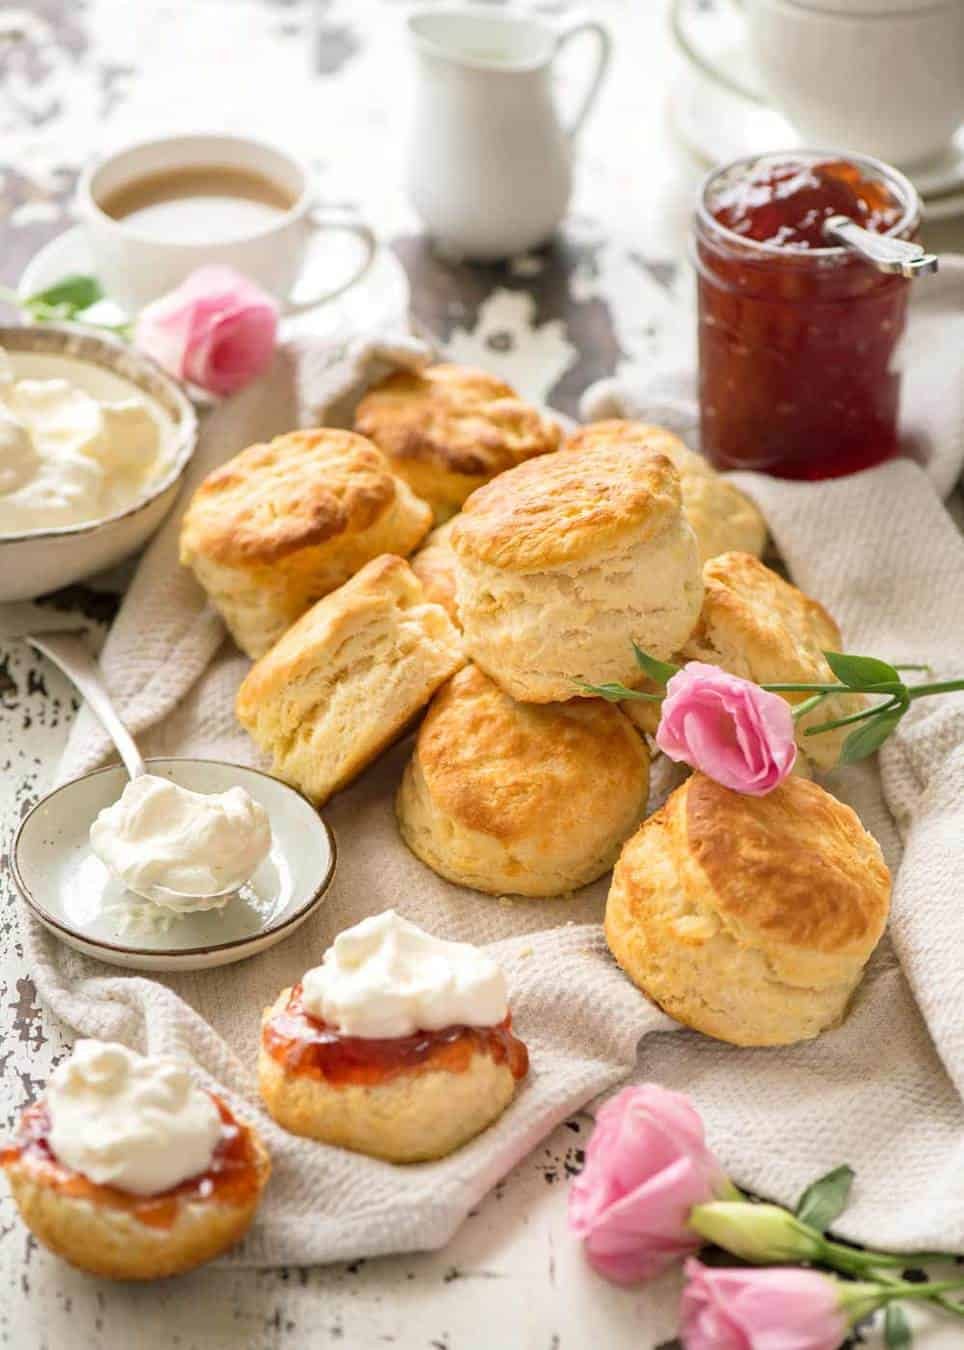
The great Aussie scone. Old fashioned comfort food that will never go out of fashion.
Interestingly, someone told me the other day that apparently there’s a Great Debate in the UK about whether jam or cream should be dolloped on first. The thought of cream first then dolloping jam on the cream never even crossed my mind!
Someone, please explain!! 😂 – Nagi x
More Aussie favourites
Lemonade Scones 3 ingredient shortcut scones!
And more afternoon tea favourites
Cinnamon Swirl Bread – easy, no yeast!
Cheese, Herb and Garlic Loaf or Zucchini Cheese Loaf– quick bread, no yeast
Blueberry Lemon Loaf with Lemon Glaze or Blueberry Lemon Yoghurt Cake
Savoury Cheese Muffins or Cornbread Muffins (personal fave😇)
WATCH HOW TO MAKE IT
Hungry for more? Subscribe to my newsletter and follow along on Facebook, Pinterest and Instagram for all of the latest updates.

Scones
Ingredients
- 3 cups / 450g self raising flour (Note 1)
- 80 g / 3 oz cold salted butter , cut into 1 cm / 2/5″ cubes (Note 2)
- 1 cup / 250 ml milk, fridge cold (Note 2)
- Extra flour , for dusting
- Extra milk , for brushing
Serving:
- Strawberry jam (or other of choice)
- 250 ml / 1 cup whipping cream
- 1 tbsp white sugar
- 1/2 tsp vanilla extract (optional)
Instructions
- Preheat oven to 200C/390F (standard) or 180C/350F (fan / convection).
- Place flour in food processor, then butter. Blitz on high for 8 seconds until it resembles breadcrumbs.
- Pour milk all over the flour (don’t pour in one place). Blitz for 6 to 8 seconds on high until the crumbs turn into ball(s).
- Transfer dough onto work surface, scrape out residual bits in the food processor.
- Knead lightly no more than 10 times just to bring the dough together into one smooth ball, then pat down into a 2 cm / 4/5″ thick disc. Dust with extra flour if necessary (I don’t need it).
- Optional: Lightly roll across the top with a rolling pin to smooth the top.
- Dip a 5 cm / 2″ round cutter into Extra Flour.
- Plunge cutter straight down and back out into dough – do not twist. Repeat all over disc.
- Remove excess dough from around scones, then carefully transfer scones onto baking tray, taking care not to smear / press the cut sides. (Note 4)
- Gather together dough scraps and repeat. I get 10 scones in total.
- Brush tops lightly with milk. (Optional)
- Bake for 10 to 12 minutes until the top is golden and it sounds hollow when tapped.
- Remove from oven, then transfer onto dish towel and wrap loosely (makes top soft).
- Once cooled to warm (10 – 15 minutes), serve warm.
- Tradition is to split the scone with hands (no knife!), slather with jam and dollop on cream.
Cream:
- Whip cream, sugar and vanilla until soft peaks form. Makes 2 cups of whipped cream.
Recipe Notes:

Nutrition Information:
LIFE OF DOZER
Of course I didn’t give him an entire scone piled high with jam and cream…… I mean, that face? I can totally resist.

Hi Nagi, I love this scone recipe, will be using it forever! Thank you 🙂
That’s great to hear!! ❤️
Hi Nagi,
I’m a big fan, tried this recipe this afternoon and it’s just the best. So easy, not as messy, very quick and absolute NO FAIL recipe. My husband thought they were the best he’d ever had. Served with the traditional Strawberry Jam & Clotted cream…yuummm!!
Yesssss, I love hearing this! – N x
This is the best and most simple NO FAIL scone recipe ever!
Yessss! So glad you love it!
Nagi, you’ve absolutely done it again – made me look amazing in the kitchen, that is! I’m not much of a baker so I don’t own a cookie cutter. I ended up using an empty Pringles container to make my non-cookie-cutter scones. They tasted amazing! Thank you for sharing! X
Clotted cream vs. jam on top is a Cornwall and Devon debate. In Cornwall the clotted cream in always on top of the jam and in Devon the jam is on top of the clotted cream.
Ah I see!
For the longest time scones and macarons were my baking foes… I don’t have a food processor at home, but I made these nevertheless and they were beautiful. Thank you for crossing it off for me!
Hi Nagi,
I was wondering how you can use buttermilk to make your scones.
Love your recipes 🙂
Oh I haven’t tried these with buttermilk, I’m sure they’d be amazing, I’ll have to give it a go and get back to you!
I look forward to hearing from you 🥰🥰
Hi Nagi
So apparently the reason the cream goes on the scone first is because it replaces the butter (didn’t know this until I watched an English program) Lol. Hope this helps:)
Interesting!!
Hi Nagi, do you mean to roll the dough to 2cm or is it 4 or 5 cm? Thanks!
2 cm thick, 5 cm wide round circles 🙂 Hope that helps! N x
A friend of mine made these every 3rd day or so. She lived in central Queensland on a lonely, dry, non-forested property. They could always see (by the dust cloud) when a vehicle turned into into their driveway. It took about 15 minutes from the road to their home, and in that time she would have mixed the scone dough, whisked the scones into the oven and have them out and steaming just as the vehicle drew up. Plus a proper pot of tea. She said the process was so easy and automatic that she never thought about it. (I was just aghast at the thought and the expertise). But it does encapsulate the traditional Aussie welcome.
Oh Margaret! That story just melts my heart in so many ways. I absolutely love it! N xx
Thank you a very clear simple way to make perfect scones
You’re so welcome Gloria! N x
Love, love good scone. Haven’t made it in long, long time. Years ago use to work with kids and scones were every week. Also long time ago one day had visitors after visitors and that day MADED three times and none left by the time last person arrived. They were all unexpected visits. Yours is interesting no eggs. Love doing rubbing butter. Thank you. Hugs for Doser!
Hi Vera! I 100% promise you, scones without eggs is more moist and tender 🙂 I tried it with and without side by side! N x
Hi Nagi! Excited to try these! Is there a way to mix dried fruit or raisins into this? Do I just add them in or do any adjustments need to be made?
Hi Kayla! I blitz until the dough starts to come together, then I add the fruit then blitz until a ball forms. If you do it too early, then the food processor can chop the fruit and that affects the dough. I find it much easier to use the food processor than doing by hand when adding fruit! N x
Hi Nagi,
Will my scones be ok/still soft if i make them the night before serving at a morning tea?
Thank you.
Hi nagi, thanks for sharing your recipes and great tips, i just love them. question. what is your opinion on lemonade scones?
Very high! I have a recipe on my blog 🙂 N x
This is such a great recipe! I have tried making scones before and they have not been good. Just made these and the ingredients are so simple and sugar free! I don’t have a food processor so just rubbed butter in which takes longer. Added a little over 2 tablespoons of extra (low-fat) milk (not just 2 as stated) as there were still a few crumbs at the bottom. I got 14 scones out but I think my cookie cutter is a little smaller. Cooked for around 12-14min to get nicely golden. Will be printing this recipe. would reccomend to a bad baker as it is failproof. Next time I will experiment with different ingredients like sultanas, lemon etc. Thank You!
That’s great Jose! Thanks for letting me know! – N x ❤️
Started using a food processor to make scones about 18 years ago, and will NEVER return to doing it with a pastry cutter, or knife & fork, or two knives to work the butter into the flour! I wasn’t familiar with the rubbing method, but it sounds just as tiresome as the other ones. In the New England states of the US, and probably all of the original colony states, scones can be found in the shape as in this recipe, in the free-hand cuts & wedge shapes, and also as a “drop” scone also, which is the most shaggy & rustic-looking, usually has a bit more milk/cream added, and is plonked onto a baking sheet using a large spoon or ice cream/cookie scoop for size uniformity.
People refer to all the forms of them variously as scones, biscuits, baking powder biscuits, or shortcake. Only in recent years had the wedge shape become more popular in the US, when assembly-line commercial bakeries started producing them that way, but the majority of those had been heavy, tough, dry, and sometimes crunchy abominations merely masquerading as scones. Anyone who has only ever had a commercial bakery or coffee shop scone in the US, really needs to try a tender and real one like this, because commercial ones don’t even begin to compare to the real thing! And, if one must have them with blueberries, currants, raisins and the like, it’s still easier to mix the dry ingredients in a food processor first, then put it into a bowl, making a “well” in the center for the liquid, and mixing in the additions when adding the milk or cream.
To save time, and because I’m a lazy baker and only bake because it’s become impossible to buy authentic bakery goods anymore even at most bakeries now, I very often use cream instead of milk, and just spread the mixture in an 8×8″ buttered baking pan, then cut it into pieces afterwards, to top slices of it with fresh fruit toppings and whipped cream or clotted cream. And, often just make “drop” scones too, since putting a piece of parchment onto a baking sheet requires even less effort than greasing a pan with butter. I’ll go the extra mile and make the effort for company, visitors, and events, but will take the easy ways otherwise, as long as it’s close enough to being as good and tasty.
I can’t remember the last time I’d actually used a biscuit cutter to make scones, but I’m absolutely certain I’d twisted the cutter, so that’s an invaluable tip that I will bear in mind for the next time I make them that way! In fact, that tip may have solved a long-standing family mystery, too, because I’d had a great-aunt whose scones had always put everyone else’s to shame! She’d made the most beautiful and delicious scones, using the same ingredients as everyone else had, but her scones were superior to everyone else’s. She’d even produced lovely scones when starting with a boxed pancake & baking mix product as a base, and nobody had ever been able to figure out how she did it! I’ll bet she didn’t Twist! I’ve got to call my sister and tell her the mystery might finally be solved. Thanks so much!
Correction: when adding blueberries and other things, it’s easier to mix the dry ingredients AND the butter in a food processor first, then transferring it to a bowl to mix the rest in by hand.
Ah! I must confess I’ve never tried blueberries in scones, I will now give it a go! So just pulse until it almost comes together then and rest of stuff and do by hand?? 🙂
Pulse the flour and butter until the butter is evenly distributed and butter pieces are the size you’d expect them to be, then transfer mixture to a regular bowl, mix the blueberries evenly into the flour mixture, create a well in the center for the milk, and mix all gently with a fork or spoon until it just comes together. Some blueberries will break apart while mixing, depending on how ripe they are, and smaller “wild” blueberries tend to work better for me, but some people use dried blueberries instead, which are even easier to mix into the dough. I’ve never kneaded or rolled out scone dough with fresh blueberries, though, so I’m not sure that would work. I just add a bit more milk than for regular scones, and use the “drop” method on a parchment covered double-insulated baking sheet to bake. Oh, and drizzle a little buttery vanilla glaze over them once baked, since the scones with fruit baked into them don’t usually get the fresh fruit topping and cream treatment.
When fresh wild blueberries aren’t available, I buy frozen wild Maine blueberries, split plain scones and pile defrosted blueberries onto them with their juice, and add whipped cream. They are also wonderful on buttermilk pancakes drizzled with real maple syrup. I have a thing for blueberries!
The scones came out great using your recipe, by the way. Sadly, local native strawberries are a couple of weeks behind in coming into season here, so had to use strawberries that had been grown 3,000 miles away and shipped here, instead, but the scones were very good, at least! And, definitely the closest I’ve come to replicating my great-aunt’s, so the dough-kneading limit and no-twist cutting tips made a Big difference! Thanks again!
Cream goes on first if using clotted cream – much thicker- . Thanks for the website. At last I have found recipes that work for me and taste great. Learning to cook for myself at over 70 meant that I had lots of failures and poor tasting meals. Using your great instructions and videos have ensured success and lovely meals. Thankyou.
We’ve all been there Ray! You should’ve seen some of my disasters in my early days! 🙂 I’m glad you find my videos helpful. Happy cooking! N xx
I am making these for the first time very early in the morning to celebrate the Royal wedding. Going to serve them with clotted cream and strawberry jam and mimosas. I live in western Canada so a very early morning. Love your website. ❤️
Oooh! I hope these were Royal Wedding worthy!! N xx
That was very easy and super delicious. As always your recipes rock Nagi !!!
I paired mine with some yummy Mauritian tea and had a very happy household.
Thank you once again.
Wonderful! So glad you enjoyed this Karin, thanks for letting me know! N x